Copyright © 2005-2008, Kimberly Chapman. All knitting graphics/patterns/instructions on this page were created by Kimberly Chapman. You may link to this page, but please do not steal/hotlink the graphics or copy the patterns to other sites without my written permission. Feel free to print graphics/patterns/instructions for personal or non-profit use, but absolutely no for-profit reproduction is allowed, including selling of finished items (except for registered charitable causes).
Knitting Rings With Double-Pointed Needles
This tutorial assumes you already know how to use double-pointed needles (if you do not, please see my tutorial on how to knit with double-pointed needles and practise with them first). It also assumes you understand how to knit and purl. All other instructions are either provided or linked to elsewhere.
Since designing these rings I have heard of ways of twisting the yarn around stitches to prevent holes from forming at the ends of the short rows. I haven't yet tried those procedures. Advanced knitters will probably want to amend these instructions to include such techniques. Beginners and intermediates might want to put it off for now. If the holes really bother you, you can always pass the yarn through/under the holes to mask them. I have done this many times.
The tutorial uses a size that I've found to be very good for toddler hands. You may wish to experiment with increasing or decreasing the stitch counts and wedge counts to produce different shapes and sizes. My own experiments have shown that 20 wedges of almost any stitch count make for a nice round ring, as long as the wedges are adjusted to be roughly proportional to those shown here. Wedges can also be used to produce curves in any tube-knitting. They can also be rotated as you go to produce a variety of twists.
The tutorial uses a single row of purple waster yarn followed by yellow and blue interchanging wedges. You can adjust these colours as you wish, including doing a single-colour ring. However, I recommend doing at least two colours on your first try to help you keep track of the wedges. See my gallery for more colour combinations.
 [d] [d]
|
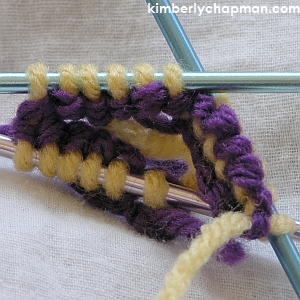
Rings look best when finished using the kitchener stitch (shown on Knitty with photos or at Knittinghelp.com as a video). However, this isn't mandatory. I've started the sample for the tutorial with waster yarn that will later be removed so needles can be re-inserted, allowing for the kitchener finish. If you are unfamiliar or uncomfortable with the kitchener stitch, ignore the purple waster yarn and cast on as shown to the left (6 sts on three needles for a total of 18 sts) using the first colour.
The rings also look better when the cast on and first row as well are done with needles two sizes larger. For this tutorial, I didn't do that (I'd like to say it was to show you an example of why it's a good idea to use the bigger size, but in reality I forgot when whipping up the sample). You will see at the end that failing to do this produces a noticeable indentation at the joined ends.
So, assuming you want your end result to look as good as possible, start by casting on 18 sts on US size 5 needles, 6 on each needle, using waster yarn.
|
 [d] [d]
|
Change to your first colour. You are now beginning a wedge section. This is what I call one portion of the ring that contains one or more full rounds plus a series of short rows (rounds where instead of completing a round, you go back and forth to add extra stitches on one side) that forms a wedge-like section of knitted tube.
Knit one round with the first colour (shown here as yellow). Keep this first round on the larger needles.
|
 [d] [d]
|
Switch to US size 3 needles as you continue (needle 3 will remain a size 5 for a bit while you work with needles 1 and 2, but remember to switch it to size 3 when you get to it at the end of this first wedge).
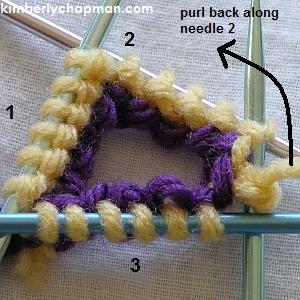
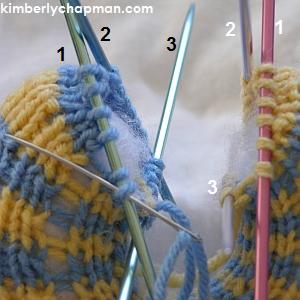
Look at the knitting in your hands and think of the needles as being numbered as shown in the diagram. It really isn't the needles that are numbered so much as their position, but to help illustrate I've used a dark blue needle in the number 3 position so you can see that that one isn't going to move for a bit.
For this round, knit as usual along needles one and two.
|
 [d] [d]
|
The trick to the wedge shape is to make short rows going back and forth on two of the needles all within one full round. Imagine that you are turning a flat piece of knitting. You'd purl "backwards" relative to the right side of the piece. But since with round knitting there is an inside and outside instead of a wrong side and right side respectively, you aren't really turning the piece in the same way as you would with flat knitting. Instead, you're going to purl in a counter-clockwise direction back along the needles.
To begin your first short row, purl back along needle 2 as shown in the diagram. Purl all six stitches.
|
 [d] [d]
|
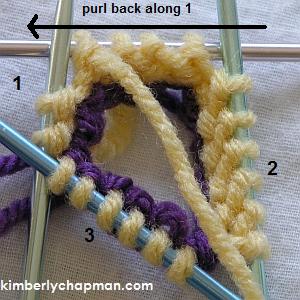
Continue purling counter-clockwise back along needle 1, but only purl the first four stitches.
To start another short row within this round, imagine that you are turning again. Leave two stitches on needle 1 and resume knitting forwards/clockwise as usual, knitting the four you just purled from needle 1.
|
 [d] [d]
|
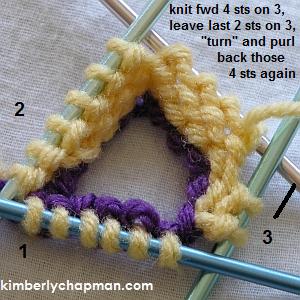
Now knit the first four stitches on needle 2 as normal, leaving two stitches.
|
 [d] [d]
|
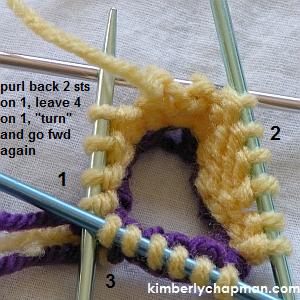
To start another short row, "turn" and purl back again along those four stitches on needle 2, then purl back the first two stitches on needle 1, leaving four there this time.
|
 [d] [d]
|
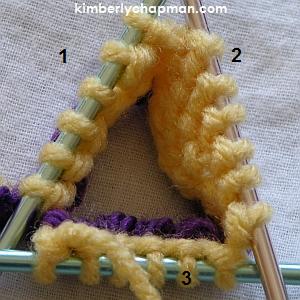
Now turn again to knit forward as usual and this time complete the round (this is where that number 3 needle will finally change to the smaller size, and you can see in the picture that it is no longer dark blue).
|
 [d] [d]
|
You have completed one wedge! If you flatten it out on its side as shown in this photo, you can see how the tube is curving.
|
If the photos are insufficient to illustrate how to make a wedge, watch the three minute, 22-second video below to see another wedge worked. I recommend downloading it to your computer (right/command click and "Save Target As" or "Save Link As" depending on your system and browser) and then watching it in full-screen mode as many times as you want without having to reload it from my site (however I am NOT granting permission for reposting it elsewhere). The smaller one will be heavily pixelated, the larger one should be fairly clear. They are .wmv format.
This is my first foray into instructional videos. I only have a still camera that does 30-second videos, so they have to be edited together. I will consider making more for other tutorials in the future if people find them useful, if they are not stolen and reposted elsewhere, and if the bandwidth load isn't too high.
 [d] [d]
|
Once you've got one wedge finished, start the next one by changing colour (you do not have to break the yarn and tie it off, simply carry the unused colour up through the piece until you need it again) and knitting one round.
Note: this is for a ring with a small centre. To increase the diameter of the centre, simply add more rows between the wedges. That's how the stacking rings in the gallery were made; the top one has one round between short rows, the second ring has two rounds, the third has three rounds and so on. I find it's easiest to keep track by counting the rounds as the first part of the entire wedge segment rather than breaking them up. For example, it's easier to remember to knit four rounds, then the short rows, then start again rather than to remember to do two rounds, then the short rows, then two more rounds. It works out the same either way, so keep track in whatever way works best for you.
|
 [d] [d]
|
Repeat as above until you have 20 wedges. When working the 20th wedge, switch back to the bigger needles.
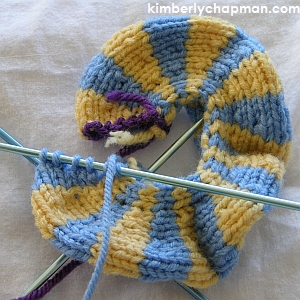
Note that as you progress, the tendency of the tube to lie flat will look deceiving in terms of the overall shape. At left is a photo of ten wedges, which is the halfway point even though it looks three-quarters complete. Once the stuffing goes in, it will puff out and look right.
|
 [d] [d]
|
Here are 20 wedges completed (again note that I did not switch to larger needles, so you'll see how that results in a pucker at the seam). It looks like too much, but see below for how it fills out nicely.
Break the yarn with a very long tail (about 16").
|
 [d] [d]
|
Stuff the ring. To avoid lumps, try to stuff from one side only, pushing the entire mass through as you go (this may not be possible with very wide-diameter rings). Stuff firmly but do not overstuff. Keep in mind that you'll need to squeeze a bit into the seamed ends once they're sewn up.
|
 [d] [d]
|
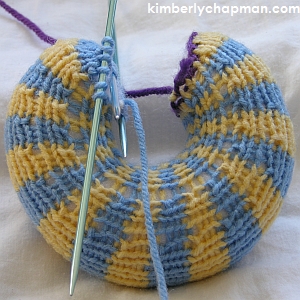
Remove the waster yarn and re-insert needles to hold the stitches from the first row. The needle size isn't particularly important as long as it's good enough to hold the stitches securely. Do pay attention closely to ensure that the first stitch of the real round is in the position of the first stitch on needle 1 on that side, because you're going to have to line the stitches up to seam them together.
If you are not bothering to do the kitchener stitch and have no waster yarn, at this point you should do a loose cast-off and sew the ends together.
|
 [d] [d]
|
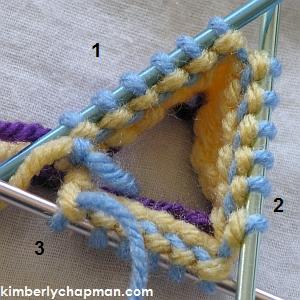
Note that the needles on the beginning side (right) should be considered in mirror order to those on the ending side (left), as shown in the diagram. You will need to keep this in mind as you begin to seam them together.
Begin the kitchener stitch as on any other piece by putting the tail on a tapestry needle and inserting it purlwise into the first stitch on the left side (do not slip it off).
|
 [d] [d]
|
Continue the kitchener stitch by entering the knitwise side of the mirror stitch of the other end, as shown in the diagram. Do not slip it off.
Start the full kitchener knit-purl-purl-knit order, using the first two stitches again and then slipping them as normal for the kitchener stitch. Continue around the entire piece (the middle can be tricky, but go slow and pay attention, feeding the needle through the hole if necessary and taking care not to accidentally wind the yarn around the whole ring). When complete, feed the yarn back through the piece invisibly a few times, make a small hidden knot if desired (a good idea for any toy destined for toddler abuse), and hide the end in the stuffing.
|
 [d] [d]
|
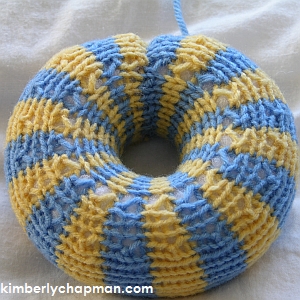
Here is the complete sample ring. You can see now why it's important to use the larger needles at the start and finish, because otherwise you get a puckered end that ruins the ring effect.
|
 [d] [d]
|
This photo shows one of my first experimental rings (on the right) before I realized I had to use larger needles at the ends and before I knew the kitchener stitch, versus a later model that uses bigger needles and the kitchener stitch. The left one also has two full rows per wedge, versus one full row per wedge on the right. The difference in finishing is obvious; it's hard to detect where the seam is on the newer version. You can click the photo for a larger version if you want to see closer detail of the difference.
|
Back to the Crafts Page.
Back to kimberlychapman.com.
Use this link to view this page with my preferred colour and font settings.
Page last updated June 29, 2007.
Email me at crafts@kimberlychapman.com
If you want to receive notification of updates on any portion of this site, simply enter your email address here and click/select the button to enter. You will be required to sign up for a free Yahoo! account to complete registration. Please note that Yahoo!'s privacy policy and other management are outside of kimberlychapman.com's responsibility. Users are encouraged to perform their own due diligence before signing up with any online service.
To find out more about the list or read messages without signing up, please visit the Yahoo! page for the kimberlychapman updates mailing list.
For more information on what these tags mean, please see About KimberlyChapman.com.