Main Cake Page - Cake Gallery - Discworld Tutorial - Orc Head Tutorial - Shelob Tutorial - Gummy Tutorial - Books - Links
This was my entry for the 2011 That Takes the Cake! Sugar Arts Show and Competition in Austin TX. It won Second Place in the Showcase. Not bad given that my goal all along was to amuse myself and not stress over every tiny detail as I did with my 2010 entry! The best part was that some of the experimental techniques I used for this cake stumped the judges! Despite me writing things like "experimental gummy to simulate water/explosions" on my entrant sheet, the judges couldn't figure out how I made the water tank and flames. Mike McCarey, the person I idolize above all others in the cake world said, "We knew you didn't use cooked sugar but we couldn't tell what that was." When I showed him the remnants of the cut sheet of gummy, nervous as always just to talk to someone I admire so highly, he took me around to all the other judges we could find to explain it to them. I've never been so star-struck and excited about any craft as I was in that moment!
The photo below was taken after the awards ceremony, when I pulled part of the tank apart to show judges McCarey, Nick Lodge, and Lorraine McKay as part of discussing the details of the cake (and why it didn't win first place: particularly that I didn't take the time to fill in cracks on the fondant where it bends over the corners of the cakes, and that I ran out of time to put up something on the back structure to cover where the claws were attached and had a messy paint job). I offered to post a tutorial on working with gummy and I was once again thrilled to giddiness when these titans of the cake decorating industry told me they looked forward to that. There's no trophy in the world big enough to encompass how amazing it feels to teach something new to those whom you deeply admire!
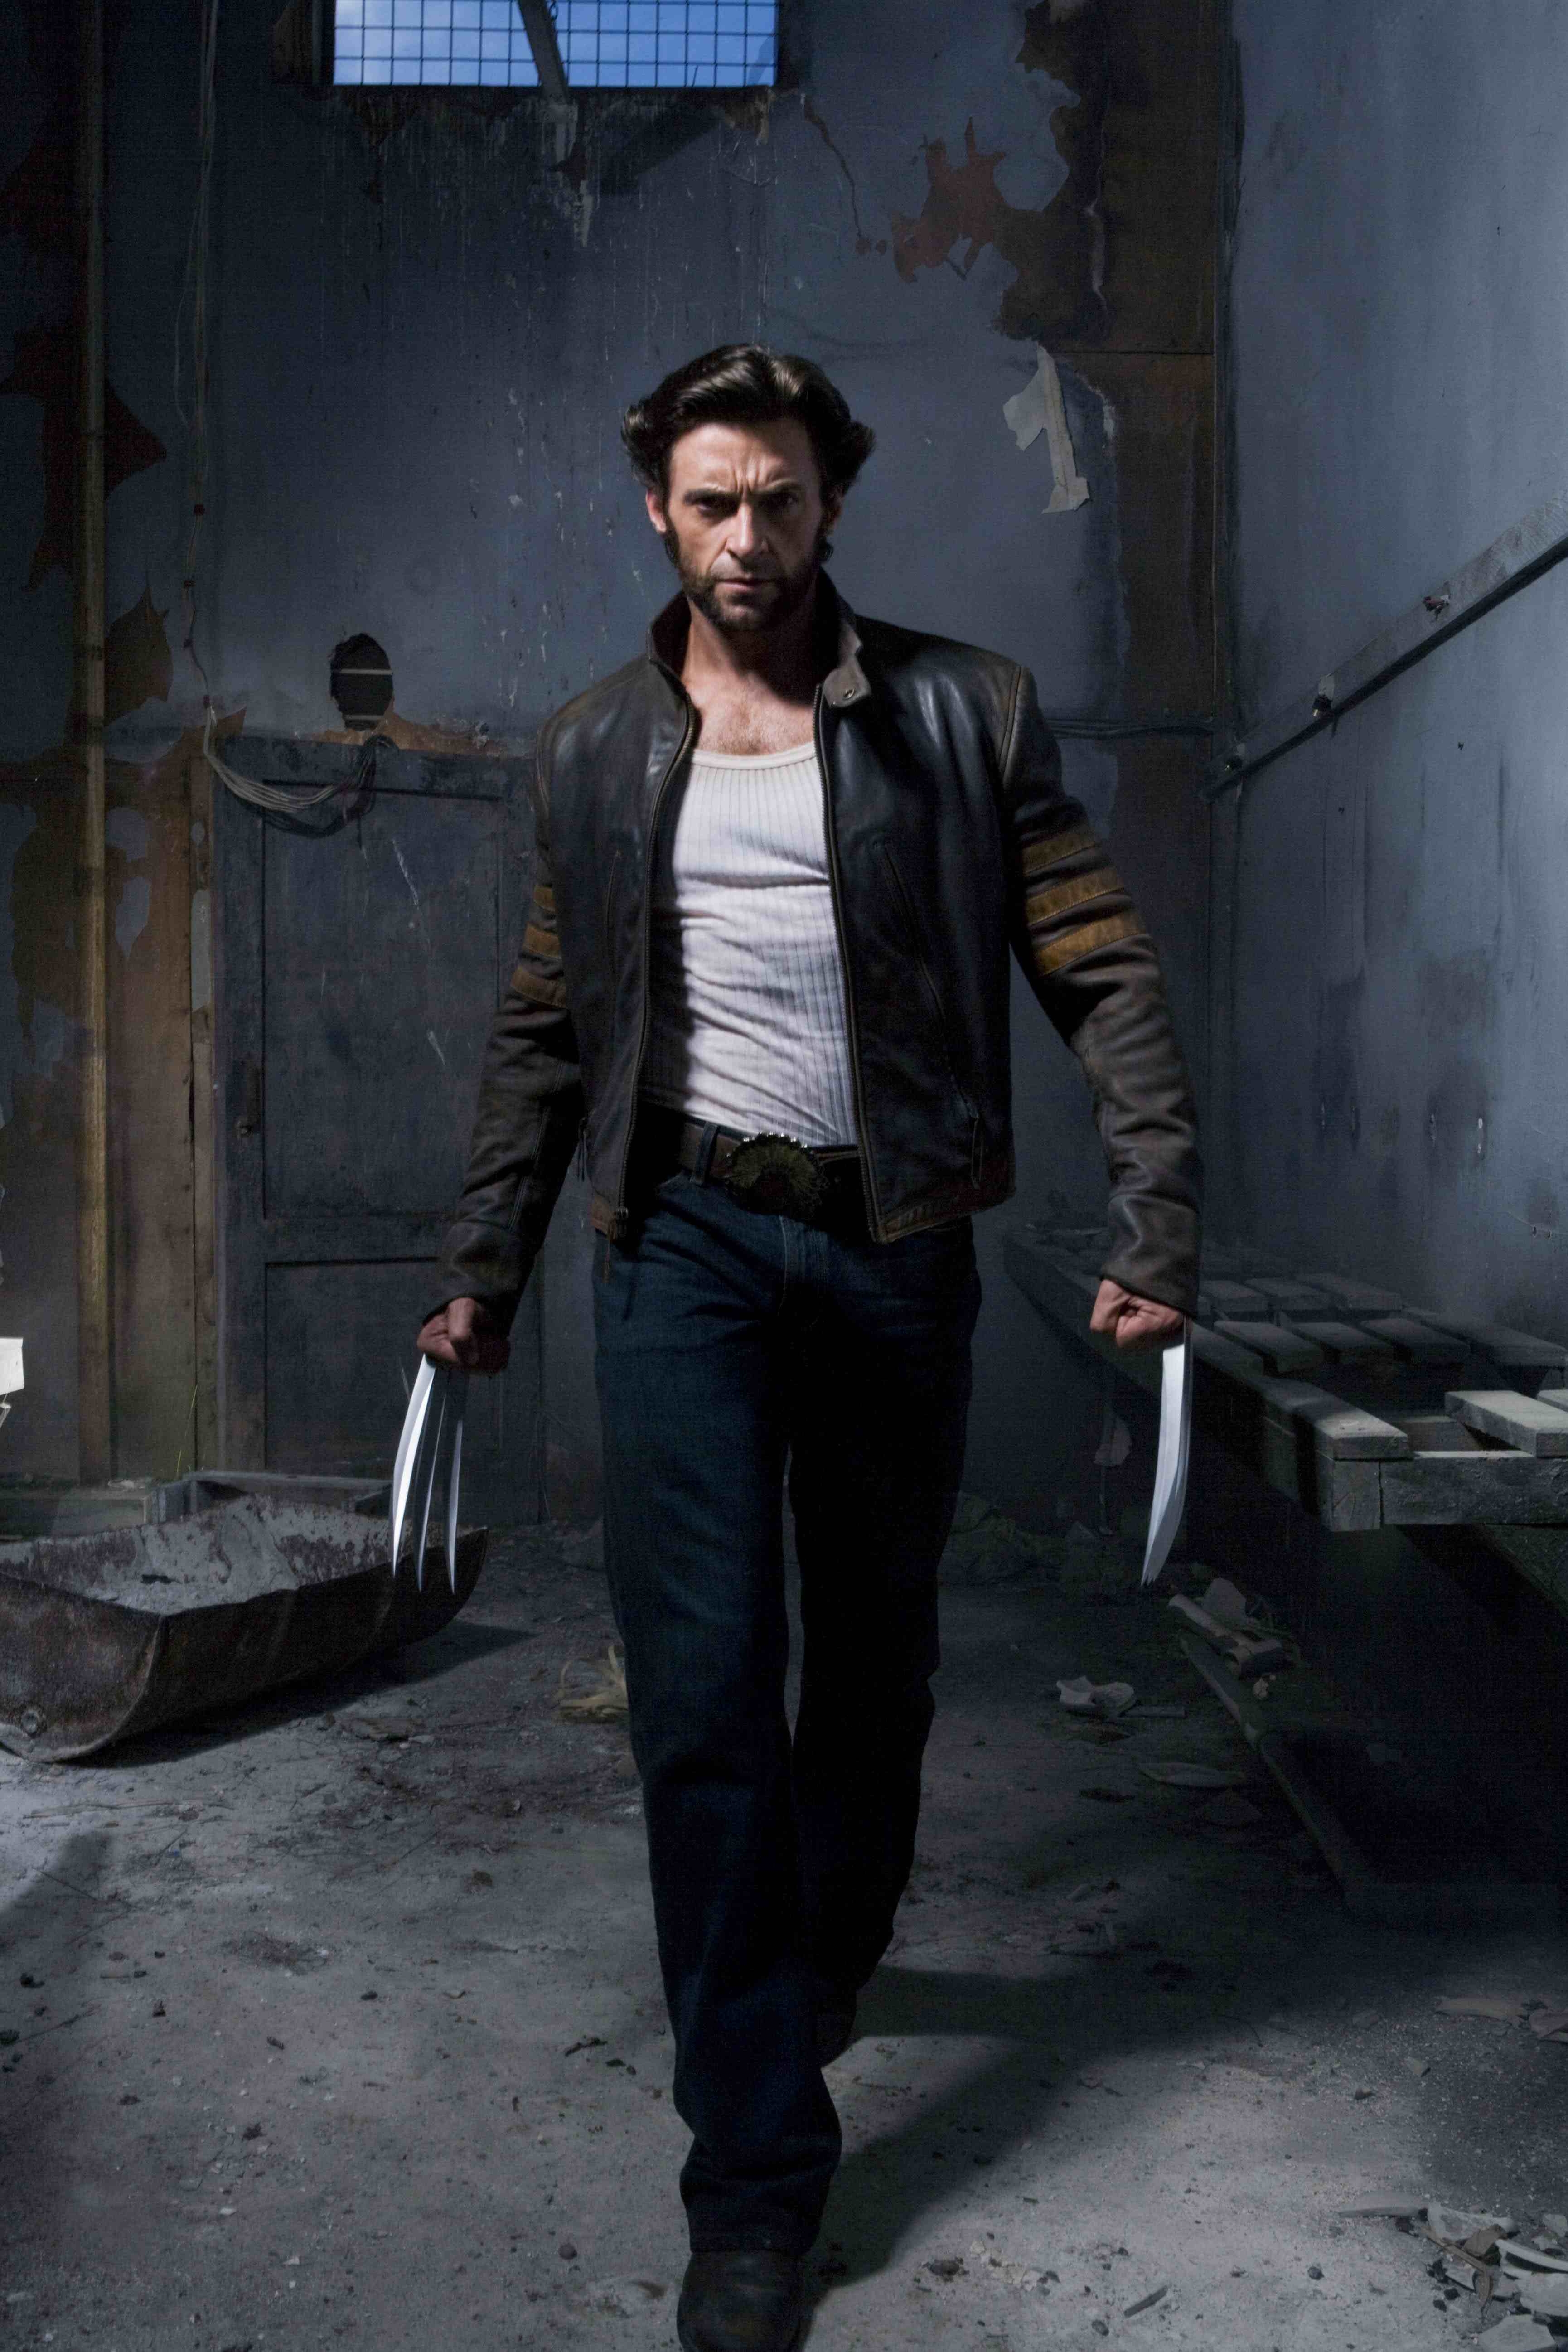
Furthermore, now begins the second part of this fangirl fantasy: the part where I get to daydream that someday the amazing Mr. Jackman himself might catch a glimpse of this cake - even though I know I didn't get his look quite right - and hopefully be nonetheless amused. Who knows, maybe he'll be so amazed that I'll be granted the honour of making the cake for the premiere of the next Wolverine movie! I certainly wouldn't mind practicing sculpting his oh-so-fine form over and over until I get it perfect. Plus I did this from two-dimensional images; just think how much better I could do if I could measure all of the features of that gorgeous head in person. Egads, I'm going to need a private reflective moment over here while you look at the photos below!
If you want photos without explanations of how things was made, either ignore the text below or go to the Flickr streams of other kind folks who took pictures at the show. If you have photos you'd like me to list, email me at crafts@kimberlychapman.com and be sure to say "Wolverine Cake" in the subject line.
Other photo sets (some include other cakes from the 2011 Austin show): Official Show Photo Group, DVDTracker's set, Denestria's set, Snarkygurl's set, DigiNik13's set.
Planning
Oh sorry, you came here to read about cake assembly. My apologies. Ahem. Cakes are subject to gravity like anything else, so they work best when built from the bottom up, which means planning a base. I've seen too many people crush their fingers because they didn't think in advance about how they were going to move the cake. Therefore, I started with a thin masonite board and cut and glued two pieces of scrap wood to the underside. Then when it was time to attach the floor flanges that would hold the PVC pipe, I was able to screw down through the masonite and scrap wood for extra stability.
Although I'd used PVC once before, I'd only ever gone straight up, flange to flange, board to board. I had to learn about the different types of joints for this project and, more importantly, how to bend the pipe when no available joint would yield the exact angle I wanted for his knees and ankles. I Googled around and learned that the trick is to fill the pipe with sand, tape over the edges so the sand stays in, and heat the pipe slowly where you want it to bend until the plastic gets soft, then bend accordingly and let it firm back up. You're supposed to use a gentle heat like a heat gun, but I don't have one, so I used my torch. Whenever the wind picked up (since I did it outside, not wanting to poison my house with the fumes), I scorched the PVC, but it turned out mostly okay and wasn't nearly as difficult as I thought it'd be. You just have to warm it up slowly and patiently.
I wrote my fangirl essay and printed out the approximate size to tape on the dummies and get an idea of how that would look, as well as the Wolverine title. Even though changes were made to the essay later, it was vital that I have an early sense of how it would look so if the whole idea needed to be trashed, I'd know that long before edible media started getting put on the structure. |
Big Wolverine
The show rules require that anything significantly carved be made out of cake or some other edible medium, so I chose not to risk transport on real cake in the chest and instead made it out of rice krispies treats. After reading a lot of advice on boards like CakeCentral, I went with the traditional recipe (6 cups of cereal to 4 cups of mini marshmallows) but omitting butter and vanilla. Also, I crushed some of the cereal before measuring to get more cereal in per amount of marshmallows. I also drilled holes in the chest PVC to insert small lengths of allthread, held snugly in place with nuts. This was all to make as firm a body as possible. Uh-oh, now I'm thinking about his firm body again... Ahem. Back to the cake!
I made his shoes out of black modelling chocolate, then used plain stuff to build up the legs and head until the model was ready for some flesh-tone to go on bust-style. I did some stiple-brushing with brown food colouring gel to simulate some chest hair. Then I made Wolverine's signature white tank top out of fondant since I didn't know how to make modelling chocolate true-white. I used a wide-rib texture mat to form the ripples, then cut a separate ribbon to put around the top for the collar. Then I got to model his backside. Oh, what a chore! I should probably be arrested for molesting this poor figure. I had to reach around from the front to do it since the pastillage claws were already in place (very deliberately sized so the inner heart of the bent claws would frame the backside, see the claw section for more on that). So yes, I gave Wolverine a reach-around and fondle-modelled his butt. I wish I was a good enough person to be ashamed of that, but damn it, it was a lot of fun! Eventually I dressed the poor man. Royal blue with a hint of black makes a decent denim colour. I rolled out thick sheets for the pants and wrapped them around, then did the same for the waist area (there may have been some more backside groping during this process). I then used the side of my hand to push in around the knees and hips to make folding and draping bits to the fabric, trying to match the original photo. Cloth is a very dynamic sort of thing, and a lot of motion in a piece can be suggested just by taking the time to replicate how cloth truly folds and drapes as a person moves in it.
I followed a similar procedure to the pants for his sleeves, which are too long by design as they are in the movie, since he acquires the jacket from someone else. In almost every photo, the sleeves are bunched up in places and hang down over his hands (making it easy to cheat and not have to fully model the hands!), but the back hangs fairly straight, so I attempted to replicate both textures. This is where things started to go wrong. The shoulders are too hunched and I should have made his chest wider out toward them. I was so worried about not making him too big that I went too far the other way, but by this point time was running short and I couldn't start over. Before starting, I found a copy of Modelling and Sculpting the Human Figure by Edouard Lanteri at my local library and studied the pages pertaining to sculpting facial features and busts. Of particular use were the bits of advice on how to build the facial muscles from the inside out. Although I didn't quite capture Jackman's likeness, the face does look proportionally human, to which I credit this book. But the book repeated over and over to not put too much on lest the model explode in size, so I appear to have followed that advice too well and ended up with him being too skinny.
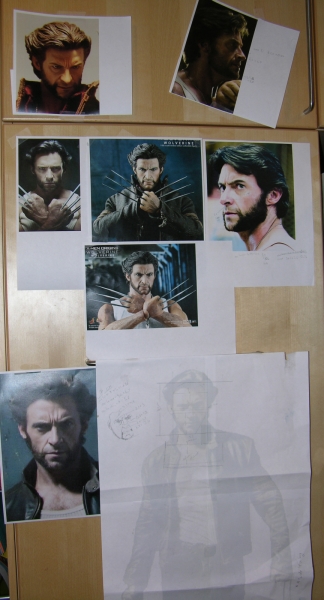
Once the eyes were on (made ahead of time with fondant left to dry, and I made several pairs at different sizes so I would have options), I had a moment of amusement at how he looked more like Wade/Deadpool from the movie at that point. I referred many times to the multiple photos of Wolverine/Jackman I had taped around my kitchen (lovely decor indeed!). I had measured many features from many angles, including of a Wolverine doll, and had a good idea of what elements fit together how, yet because my initial measurements were a bit off, the whole thing ended up off. The modelling chocolate kept getting so warm in my hands that I had to hold an ice pack every few minutes just to keep it from melting into goo. Then I had to leave the whole thing alone to go pick my daughter up from school, and on the entire drive I was quite depressed that I'd left him in a state looking a lot more like a pissed-off James Woods than anything close to Hugh Jackman. James Woods is a fine actor and I'm sure he's a lovely person but he's not Wolverine, so I was bummed. Once back home, I worked to fill his face out as best as I could with some big hair and mutton chops as part of Wolverine's signature look. I made sure one eyebrow was raised as well. The beard and hair were made with real-chocolate modelling chocolate. I am reasonably happy with how that turned out; the trick is to style what appears to be waves of hair instead of going for roughly hatched individual hairs. The eyebrows are painted onto the fleshtone but with hatch-marks made in advance for texture. I also stiple-brushed the edges of the beard and on his neck to simulate Wolverine scruff. I used the slightest bit of maroon painted into his lips with most of it wiped away to give them a more natural tone, and I did likewise with light brown in his ears and nostrils to add a bit of life. Click here to see a full-size version of the finished head with lots of gory details of the paint job. |
|
|
Claws
Using the paper cutouts shown in the Planning section above, I cut out cardboard templates of the claws, including marking the angles and lines where they would meet and sit inside the cake. Then I made some pastillage using the tutorial and recipe by "chefette" on eGullet and rolled it out on my big blue mat using 1/4" rolling guides. Had I been going for a top prize, I would have rolled it much thinner to impress the judges, but time was of the essence and I didn't want to risk breakage. This turned out to be a good plan (even though Nick Lodge told me that I should have gone thinner) because the sheer size of these things meant the undersides would not dry. I had to flip them over repeatedly, and because of their length, broke several during the flipping process due to being unable to support the whole length at once. I broke so many of the curved ones that my family couldn't eat meals on our dining room table for most of the six weeks I worked on this cake, which is one of the main reasons this is my last showcake unless someone gives me some long-term studio work space! I shaped the inner edges with a knife to make them somewhat sharp, originally with the intention of sanding them to make them nice and even. Unfortunately, as I kept breaking them, time ran short and I got more concerned about breaking while sanding, so I only did minimum sanding. Again, Nick Lodge pointed out that I should have done much more work to smooth the edges, and he's right. But I just didn't have the time or energy to do that level of work this year. That being said, they were somewhat strong and sharp: on the last night of work, somewhere around 3 am, I was reaching through from behind to do detail work on the back of the jacket and accidentally punched one of the pointed tips. As I gasped, expecting it to break, I noticed that it not only had stayed together but in fact given me a nasty scratch. Yes, I was clawed by my own Wolverine fangirl cake.
It also didn't help that while the first side went up and stayed in place just fine (using heavy objects around the cake to keep the claws in place while the royal icing glue dried), the first claw on the second side shifted by about a centimetre at the base. That might not sound like much, but it made a huge difference further up the angle; the claws on that side are parted, which is not only noticeable but weaker. It also threw the measurements off for mounting the side cakes at the show, which was luckily overcome by slightly turning the T-joint inside the modelling chocolate, but made even further mess of the already messy back. |
Essay and Title


I hate piping. I'm terrible at it and it hurts my carpal-tunnel hand something awful. But I'm a verbose fangirl so I was compelled to include a lengthy, cheeky essay about why I love Wolverine so much. I got a particular thrill out of putting all of the words pertaining to love and lust in red.
I also skipped the red words until after all the black ones were completed. If I didn't have it all templated out, that would have been fairly risky.
By request of several fans at the show, here's the text of the essay (my five-year-old has picked up the phrase, "Nom nom nom!" which amuses me greatly): This is my fangirl Wolverine ultra-cake. Why do I love Wolverine so much? Is it the surly, snarly attitude? The butt-kicking? The anti-hero disinterest juxtaposed with a deeply-buried soft and loyal heart? The mega-angst? Being Canadian? YES. All of that and more. Wolverine is predominantly a comic book character, but my fangirl heart mainly beats for him as portrayed by Hugh Jackman. If you need to ask why, you probably don't have a pulse. He looks delicious even when he's not made out of sugar. Hot, angsty, and kicks butt? I'm in love! I truly yearn for "Wolverine: The Musical", to be written by Joss Whedon and sung/danced/slashed by Jackman. I want melodic fight scenes, songs of lonely despair, and a bittersweet harmony as Sabretooth and Wolvie smack each other around. I may explode with joy, but I'll risk it. I'd love a weekly cooking show where he Ginsu-chops everything, gets mad about it, and storms off set. Or "Storytime With Logan" where he reads to the little kids at Xavier's school and needs another beer to growl his way through "Where The Wild Things Are" without going wild himself. Summed up, I desire all things Wolverine, all the time, doing everything for my selfish fangirl pleasure. If I can't have that, can I at least eat him in cake form? Mmmmm, you can really taste the pent-up fury! He's angst-a-licious! Nom nom nom! |
|
Once the black letters were done, I did the same with the template on some red fondant. It was fairly tricky to get all the tiny pieces of the heart placed properly around, but I wanted the heart to look integral to the letters as opposed to the letters sitting on top of them, especially using the point of the V as the point of the heart. |
Uniform
Still, a Wolverine homage would not be complete without mention of the classic comic outfit. It's even addressed in the first X-Men movie when Wolverine complains about the black leather uniforms and Cyclops asks if he'd prefer yellow spandex. So I included it, but made it appear cast-off as if the main figure is walking away from it. As with the main figure, I found an image of the uniform and increased its size to match the printout of the PVC skeleton. I rolled out fondant, laid the printout over it, and traced the elements of the uniform with a ball tool so they'd show up on the fondant. Then I cut it and assembled it as necessary, letting it fold and drape on the cake. This included cutting it to go around the rear leg pole, but I didn't worry about the join being perfect there since I knew I was going to build a shoe over it. For the hood, I cut out some of the yellow fondant and draped it over a small bowl about the size I intended to make the main figure's head, then shaped the hood and affixed it to the rest of the uniform. Once it was all in place I added the black stripes and the belt. I didn't have time to do the boots, but I also decided they would have looked a bit lumpy on the side of the cake anyway. I draped one glove casually toward the front of the cake and the other hanging through the claws toward the back, partly to give more interesting things to look at from the rear, and partly to enhance the cast-off look.
|
Quilling
I recognize that what I've constructed here is quilling-like, but not proper quilling, in large part due to the cross-hatch at the top of the motif. But the heart and swirls to the sides are quilling-inspired. I made the red parts in advance on a curved piece of styrofoam leftover from last year's entry and let them dry. Once I'd measured out the space on the lower cake and marked it, I then affixed the red pieces with red royal icing. When they were dry, I began building up black strips as you can see in the photos. I learned pretty quickly that I had to cut the strips (using an Oxo Herb Mincer to cut them quickly and evenly in ribbons) and let the fondant start to firm up if I didn't want to have to hold it in place for ages to keep it straight while it dried. It was a slow process but I was happy with the overall effect: something evoking both love and the crossing of the claws with an X literally in the heart of it all. I considered doing more quilling on the back of the upper cake but decided early on that that would be too busy. Instead I placed a single red maple leaf as an homage to Wolverine's Canadian birth.
|
Table DecorationsSometime during early February it occurred to me that it'd be funny to have conversation Valentine hearts around the cake as table decortions, if only I could find some that had Wolverine-ish things written on them. I'd been avoiding all things pink and girly on the cake itself, but this small cute addition struck me as funny. I Googled for a recipe to make my own conversation hearts and found an easy recipe using the same sort of ingredients as fondant. They air-dry and then you write whatever you like with edible markers, which I already had on hand. I made a single batch which produced tons, so I wrote up some with words from my daughter's school for her Valentine's Day party (the teachers and other parents all report that the candies are much nicer than store-bought ones, which is great since I couldn't try them as they're far beyond my sugar tolerance), plus more Wolverine ones than I could possibly use, and still had leftovers. I used the largest of the Ateco set of mini plunger heart cutters to quickly churn a bunch out. For some of them, I used a needle tool to make three claw marks. Once they were dry I wrote the following words on them: Hero, Grrr, Angst, Who Am I, Wolvie, Bub, Roar, and Claw Me. I also drew some with maple leaves and X-Men symbols. At the show, I could really tell when someone was truly paying attention and noticed gleefully that they didn't have traditional words on them but these silly substitutes. 
|
All of the smaller side cakes were made by carving styrofoam dummies to fit over an assembly whereby a PVC pipe was affixed to a board with copper brackets, screws, and glue. This way, had they been real cakes, the weight would have been been borne by the board and pipe and there would have been no risk of the pipe tearing its way up through soft cake.
The intention was to surround the main Wolverine figure with vignettes of his movie history, beginning with his creation as an adamantium-armoured hero in the tank, followed by the scene where he got his vintage clothing and motorcycle, then a battle scene from his X-men days, culminating in his acceptance of who he is, even if he can't remember all the details.
Hardly anybody other than the judges noticed, but all of the small cakes had their undersides covered with fondant made to look like claw marks.

Tank  
As a result of the excess moisture under the gummy block, I ended up inserting some spare pastillage chunks to hold the assembly up to the right height. I made pastillage sides for the tank and let them dry thoroughly, then cut some dried gummy sheet (again, see the gummy tutorial pages) and pinned it between the tank bottom and the pastillage sides with a bit of royal icing. The appearance of water against the tank walls and on the surface was accomplished by trimming off more bits of the gummy sheet and adhering them to the gummy walls with piping gel, then brushing the gel across the surface to join with more piping gel on the top of the cast gummy block. I also used piping gel all over the figure to simulate a wet look, letting small bits of it drip off as I did with the Alien Queen's drool on the previous year's entry. Summed up, while I had trouble with moisture during the construction of this element, I do think it came together rather well as a way to make a water tank without using hot sugar. Plus there's a naked Hugh Jackman (sort of) on it. That's always a plus. See the Destruction section for a photo of what the gummy block looked like when removed from the tank later. The sides of this cake were decorated with simple fondant rolls made to look like pipes, evoking the same grey and red pipes from the tank room in the movie, except that I bent some of them into heart shapes. Even the valve wheels have hearts stamped into them. |
Explosion

As with the chest in the large central Wolverine sculpture, I made the barn out of rice krispies treats so it would be fully edible. I covered it with some royal icing, then fondant, which I pinched out in many random, twisting bursts. On top I added more fondant but in rounded globs to serve as puffing smoke, having studied several screen shots of the explosion in the movie and noting that while flames poke out the sides, it's fat plumes of smoke that pushes off the roof tiles. I spritzed the top with black Wilton colour spray to make it grey. I then set aside that assembly to dry rock-hard, having previously run some experiments in dipping fondant chunks in gummy at different levels of dryness and determining that it was vital get as much moisture out as possible. Also at this time, I made grey walls and cut the boards but otherwise left the boards whole for the time being. Any explosion looks more realistic if what's being pushed out starts as a whole; if you randomly throw junk on there, it'll look like a junk pile blew up, not a wall. Similarly, I rolled some dark grey onto brown and cut chunks to look like roofing material with tiles on top, again following what I observed in the screencaps. Once the fondant was dry, I made yellow gummy (see gummy tutorial pages) and used a baster to drizzle/squirt the gummy all over, leaving only a few areas white. I also picked up the assembly to get the gummy up and under some of the flame twists, which is how one of the smoke plumes got broken, but I wasn't worried since I knew I could stick a tile over that later. I then had to wait about 48 hours for the yellow gummy to harden on before putting on orange and then red, less of each colour respectively. For those colours, I also held the assembly sideways to let the drips cool that way so, when upright, the flames would appear to be going out and up instead of down. I then gave that another couple of days to dry. Then I used softened, gooey fondant bits to glue the debris to the flames, taking each wall board at a time and breaking it where the flames burst through. I didn't use every piece, as an explosion would inevitably render many sections into dust, but I took care to give it the feeling of having come from a whole wall to start. I did likewise the roof tiles, some of which had stuck together as they dried which made it easier to stick them on in sheets as if the plumes were tearing through chunks of the roof at a time. I also included some hay bales to hint at the surroundings of the barn without going overboard and cluttering up the cake with too much detail outside of the explosion itself. The full version of the middle photo below can be seen here for those who want to inspect it in detail.   
|
|
The side of this cake was decorated with royal icing using a stencil of a heart grid. I chose that for it's country, homey style in keeping with the kind hospitality of the old couple, and went with black and red to carry the whole cake's colour scheme along. To stencil on a cake, simply put the stencil firmly against the surface you want to decorate, load up a spatula or bowl scraper with icing, and drag it uniformly across, then carefully lift the stencil away. I had seen this technique demonstrated but never tried it before (other than a practice go on a mat before actually putting it on this cake), so it's not a perfect job but not bad for being new to the technique. |
Fight

I made the figures on wire armatures so they'd be strongly held to the cake. The fence is made of pastillage around a wire outer frame with piped royal icing for the inner links. It was tricky getting all of these elements together without breaking them; in fact, I broke both sets of Wolverine's claws the first time around and snapped several bits of the piped royal off as I went. I also had to add more wire between the characters' hands and the fence just to keep it on in a stable fashion. It is actually resting on Mystique's hand and arm as well as Wolverine's upper fist. The side of the cake was decorated with entwined hearts made of double-sided modelling chocolate. This motif was meant to carry the heart theme through in a twisted fashion to evoke the way Mystique moves during the fight, turning from the appearance of Wolverine into her own form in mid-air, as well as hint at her own twisted desire to become romantically entangled with Wolverine in the second X-Men film, offering to be whatever woman he desires. |
Acceptance 
As he walks away with the child in his arms, the kid sticks out a blue tongue at Stryker. The Wolverine figure is made on a wire armature with double-wired arms to be strong enough to hold the child figure. It is deliberately placed slightly off-center on the cake because although Wolverine accepts his new role, it doesn't come easily. The cake is designed to have Wolverine walking away from the viewer with the cast-aside dogtags in the foreground. When I put the thin strand of fondant on the cake to then indent as the necklace, it accidentally fell into a sort-of heart shape. I liked that effect so I went with it, but it wasn't originally planned. The side features heart cutouts textured with a snowflake mat, sprayed with pearl spray before being put on the cake. This again carries the heart theme through, this time matching the snowy scene from the film. |
While I like to save some show cakes, I'm running out of room in my house. Thus, this cake was designed from the start to be destroyed, as real cakes would be. At the end of the show, I dismantled it before an audience of show volunteers, including some students who recorded video (if/when they post it to YouTube I'll link to it here) and one who took these photos on my camera for me (if he sends me his name I'll give him credit!). The show's official photographer also took some shots so when I get those I'll post them as well.
I explained a lot of the construction as I went, but since most of that is covered above, I'll let the photos speak for themselves. I cut off poor Mr. Not-Quite-Jackman's head (which I did save in my cake cabinet) and pretended to kiss it and his backside, gave away the figures, smashed the claws and used them to cut more pieces off, held up the gummy block so everyone could see the wet mess on the underside, attempted to smash open the barn to reveal the inside but failed because the whole thing was too solid, and by popular demand smashed the left three large claws against the figure which sent shards flying across the hall. Eventually I let the students have at it and they had a ball destroying the rest. I dutifully cleaned it all up and brought the detritus home in a box and have since begun harvesting any reusable parts such as the PVC. I had said I would lift the whole large figure out and hug him, but he was so well-attached to the board that I couldn't get him off in one piece. I suppose I'll just have to settle for the hope that one day the real Mr. Jackman will see this and come down to Austin for a fangirl hug!


More destruction photos from the show's official photographer, including giving way figures to other volunteers and pretending the head is the niftiest finger puppet ever:


Main Cake Page - Cake Gallery - Discworld Tutorial - Orc Head Tutorial - Shelob Tutorial - Gummy Tutorial - Books - Links
Use this link to view this page with my preferred colour and font settings.
Page last updated April 14, 2011.
Email me at crafts@kimberlychapman.com
If you want to receive notification of updates on any portion of this site, simply enter your email address here and click/select the button to enter. You will be required to sign up for a free Yahoo! account to complete registration. Please note that Yahoo!'s privacy policy and other management are outside of kimberlychapman.com's responsibility. Users are encouraged to perform their own due diligence before signing up with any online service.
To find out more about the list or read messages without signing up, please visit the Yahoo! page for the kimberlychapman updates mailing list.
For more information on what these tags mean, please see About KimberlyChapman.com.


 One doesn't engage in this level of craft without a plan. Long before I made fondant, modelling chocolate, or royal icing, I built my board, cut and assembled the PVC frames, and shaped the styrofoam dummies (everything made out of styrofoam could have been made out of real cake but wasn't because these things take weeks to put together and it'd be a mouldy mess). I also spent a lovely long time choosing what photos of Wolverine/Hugh Jackman to print out. Then I spent even more time poring over those photos, measuring and comparing them. Such a hard chore...as hard as those biceps and pectoral muscles...
 After carefully measuring relative proportions and knowing how tall my stacked cake dummies plus fondant would be, I cut several 1/2" PVC pipes and fitted them into various angle joints to create a human-like form in the position of the
  I also built a PVC structure to support the large pastillage claws behind the main large figure and to allow four smaller side cakes to be inserted and held aloft. Once I had all of the PVC and styrofoam in place, I roughly planned the claws on paper so I could tape them to the PVC and get a feel for how the entire thing would look.
 Obviously, the large Wolverine figure was the focal point of this design, even though he was one of of the last elements to be completed. Most of that was planning: the pastillage claws had to be up behind him first, then the old comic uniform draped over them and the cake, and then the large figure walking on top of that. I admit I also put it off because I was completely petrified that I'd screw it up, having never made a large-scale figure before, much less going for a realistic look.
 I covered the cereal treat body with candy melts to smooth out the surface a bit and to make it better for mounting modelling chocolate later. Modelling chocolate is excellent because with just a bit of water, it sticks to almost everything, including the PVC pipe. I learned everything I know about modelling chocolate by attending a Mike McCarey demonstration on the subject at the 2010 Austin show, and I definitely encourage anyone who can get into one of his classes or demos to do so!
 I used a pounce wheel to quickly add the hint of seams up the pant legs and around the hemline. Then I added his belt and buckle, the latter made out of pastillage in advance, then painted with food gels and spritzed with pearl spray.
 When I began the face, I stuck some blobs on temporarily just to size it out, and realized he was about to be a pin-head. I removed the temporary bits and greatly increased the size of his head and neck, then retraced the guide lines as per the Lanteri book, basing everything from the ear points marked with toothpicks as Lanteri suggests. But here again, I should have made the forehead wider, and in not doing so, the entire model suffered as I progressed.


 For his hands, I pre-made claws (with plenty of extras to insure against breakage) out of pastillage with holes set in the extra length at the rear. I used bits of broken scrap pastillage of the same thickness in between the claws and wired the whole assembly together snugly. That way I could wrap the whole claw set in modelling chocolate, add hand details on top, and have it rigidly contained. I also wrapped an extra length of wire between two claws, buried in the hand flesh, and shoved that up into more modelling chocolate packed into the PVC to help prevent the claws or hands from sliding off the ends of the pipe armature. I put these on last so I would not risk bumping them and breaking them.
 One of the fun, dorky things I decided to do early on was have gigantic, shiny claws sticking out of the cake, with the index claws curled into a heart shape. Yes, I know Wolverine's claws don't bend (except maybe when Magneto has at him). I don't care. This was MY fangirl cake and I wanted some sharp, violent, cold, hard, adamantium lovin'.
 After a lengthy quest for super-shiny edible silver, including begging manufacturers of dragees and Jordan almonds to be able to buy their coatings to no avail, the owner of
  The claws were mounted on a PVC frame covered in black modelling chocolate, glued on with royal icing. When I painted the silver on, I didn't worry too much about being neat against the frame because the original plan was to cover that frame with hearts and a cheeky sign at the back encouraging people to peek through the claw-heart to gaze at the big figure's backside. But since I finished the cake at 5:30 am on the day I needed to go volunteer at the show all day, I didn't do any of that. Again, the judges noticed, and the messy back in and of itself may have been what cost me the top prize.
 The original essay as shown in the
  Even with all of this planning, I forgot to leave room for the height of the dogtags in front, so part of the words were obscured. Incidentally, the dogtag necklace was made out of fondant in a bead mold, painted with the same Albert Uster silver as the claws, and the tags were pastillage. I let the pastillage start to set up, then cut out indentations where it was still soft inside, and used a small ball tool to tap-trace in the letters and numbers (which are accurate to the Origins movie).
 I also pre-printed a template for the title. I experimented with cutting the letters out by rolling fondant over a translucent board with the paper underneath, but that meant I kept cutting in too far. Instead, I rolled it out with some shortening so it wouldn't stick but also wouldn't dry out, as it does when rolling on powdered sugar, laid the template over it, and used a fine ball tool to trace the letters on the paper so an impression would pass through to the fondant. Then I cut the fondant with an xacto blade and carefully placed them on the cake.
 I'm sure some comic lovers out there will hate me for this, but I really do think the yellow spandex uniform is silly. I get that it was designed in a different time with different fashion sense, but to me there's no time period in which bright yellow with blue external underwear is a good idea. The classic Wolverine outfit looks like something Siegfried and Roy wish they'd dreamed up: its neon-bright, it has stripey-claw marks, it has gigantic black pointy bits on the face and boots, and it screams for the viewer to stare at the blue-highlighted pelvic area. It's not like I have a problem with staring at Hugh Jackman's sexy bulges but even I draw the line at this level of retinal assault.
 One of the benefits of making a showcake is the excuse to try techniques you've heard about but haven't otherwise had a reason to use on a regular cake. Quilling is a paper craft where strips of paper are curled and then fixed in place to create elaborate designs. It has recently cropped up as a stylish way to work fondant or gumpaste on the sides of cakes.
 The tank started by making the naked figure, or at least as much of him as I could justify given that he was being entered into a family show. I had to fudge the scene a little, because I wanted the iconic image of him roaring with his arms and claws out to the sides, but in the Origins movie that pose comes at the end of the leap out of the water so the water would be off of him and he'd be shown in his full nude glory. Therefore I kept the water swell up on him in order not to be disqualified for blinding the innocent eyes of the public with the shining splendour of all of those fun bits.
 I built the figure on a wire frame that could sink down low into the cake for maximum stability. Once the platform for the inner tank was ready, I put him on and built up some white chunks with the hope that that would enhance the translucency of the gummy. Unfortunately, I had some issues in this experimental technique (see the


 In the Origins movie, after Wolverine gets his adamantium, he escapes by running naked through the surrounding area until he finds refuge with an elderly couple who give him their son's old clothes. The baddies after Wolverine shoot the couple and blow up their barn with all three inside, but Wolverine grabs the old man's motorcycle and bursts out of the flaming wreckage. I both wanted to capture the importance of this birthing of more of Wolverine's character, and also really wanted to see if I could replicate an explosion in edible media. Plus, as Stephen Colbert noted about the Origins movie, a great deal of it comes down to Wolverine leaving the scenes of multiple explosions. That amused me.
 I made teeny tiny Wolverine and motorcyle out of fondant and pastillage (I wanted the bike handles to be very strong). Pushing fondant to this level of miniature is tricky on several levels: it wants to crumble if it's too dry or melt onto your finger if it's too wet, it loses pigment quickly, and it's incredibly difficult to handle in general. But I got him on there well enough to be clear what he's doing. I originally intended to add more of the scraps of yellow and orange gummy to circle around him, but ran out of time and worried he'd become lost in that.
 This replicates one of my favourite fight scenes from the X-Men movies: when Mystique and Wolverine battle in the Statue of Liberty museum in the first film. Mystique grabs a bit of fence and smashes Wolverine with it, but he just gets mad and slices through it almost all the way to her before she leaps out of his way.
 At the end of the second X-Men movie, Stryker offers Wolverine the chance to reclaim his lost memories if he abandons the kids from Xavier's school and rescues Stryker instead. Stryker puts it to Wolverine to choose between him and "that creature in your arms." Wolverine rips off his dogtags and throws them into the snow at Stryker's feet as he declares, "I'll take my chances with him." This scene is symbolic of Wolverine finally and fully chosing the side of good despite the temptations of evil. He casts aside his need to know about his past in favour of helping an innocent kid. He accepts his situation for what it is and decides to make the best of it going forward.


