 d
dMain Cake Page - Discworld Tutorial - Shelob Tutorial - Gummy Tutorial - Gallery - Books - Links
This tutorial can be adapted for other head styles. I chose an orc because I'm a sicko geek into that sort of thing.
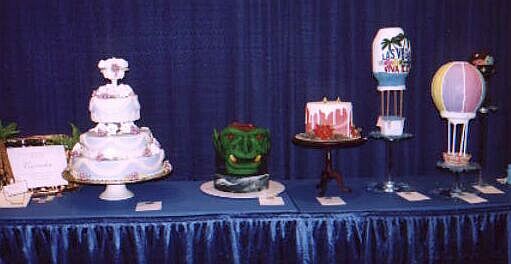
This was a cake made for the 2003 ICES show in Las Vegas. The last photo shows it on the table at ICES, surrounded by much prettier things. It was largely experimental, but it turned out pretty well, though it could use some refinement. Please understand that I'm pretty familiar with sugarcraft; this is not a cake for beginners. If you don't know how to handle sugarpaste, don't attempt to make this cake. Practise with something simpler first!
If you do decide to make this cake, here's a list of what you'll need:
Click on the pictures to see a bigger version of them.
|
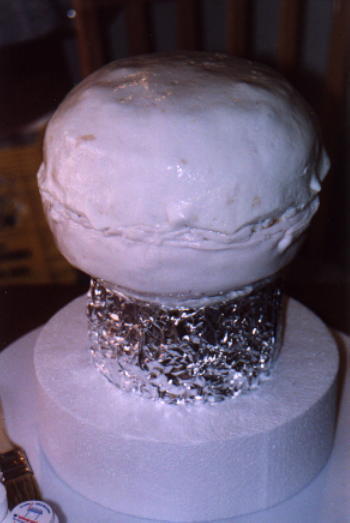
Baking/Preparing the CakeStart by making two cakes, using a full cake mix for each, in the Pyrex bowl, being sure to liberally cover the bowl with shortening and flour first. If you only have one bowl, do it twice. Be sure to give the cake extra time to cook, probably at a slightly lower temperature than normal, because it will be quite thick in the middle. It is better for the cake to be slightly overdone than underdone. After the cakes have cooled, carve them down into more of a half-sphere shape if the shape isn't already good. Cover them with buttercream, and then with a generous layer of plain sugarpaste/fondant. Let them sit long enough that the sugarpaste is good and hard. You're going to have to pick them up, so this really requires cooled, firm cakes. |
|
Assembling Stand for Head CakeYou could just put the head on a platter, but that will make it really hard to build a chin. You really need a neck support. Take a 12" cake dummy, place a 6" dummy on top in the middle, and trace a light pencil line around the 6". Move the 6" and then use a sharp knife to carve out an indentation, about an inch or so deep, that the 6" will fit into. It should be a very snug fit. If you make the indentation too big, put some foil around the 6" in a rough fashion to expand it a bit. Push the 6" into the 12" and ram through two cake dowels to stabilize the structure and help hold it together. The dowels will stick up out of the 6" so that the cake can also be stuck on them. |
|
Placing the CakeVery carefully, pick up one of the sugarpaste-covered half-sphere cakes (I used a large barbecue spatula to help me) and turn it over so the curve is downwards. While supporting the cake evenly with both hands, position it so the dowels look like they're evenly placed and that the cake, if put straight down, would be centred on the stand. Then let the cake rest on the tips of the dowels until they gently break through the sugarpaste. Slide the cake slowly down the dowels until it rests on the stand. Repeat this process with the other half, only not flipping it over. You will need to hold it by the bottom or else the cake will fall out of the sugarpaste, and you will need to spread your fingers wide so they don't just poke into the cake. Try to get both halves centred as well as possible before the dowels go through them. If you wiggle them around with the dowels inside, the dowel holes will get larger, meaning the dowels will not be supporting the cake as well. |
|
Assembled Cake and StandOnce both halves are placed, solidify the structure by putting more sugarpaste around the seam to join it together. It doesn't have to look pretty because it'll all be covered. |
|
Shaping the Face BaseSketch out the basic lines of where things will go on the head using a bit of gel colour and a small paintbrush. It can be messy because it'll all be covered later. But this should help you lay out the face. Place the underlying bits of face on the "skull" of the cake, using water or sugar glue to attach them. Don't about their ragged edges, since those will be covered by other features later. In this case, I went for a built-out chin connected to large, flat cheeks, and a large, flat upper lip/nose support. If the bits of face are sliding off, place some temporary toothpicks to hold them on. Let them dry on fairly solidly before proceeding. |
|
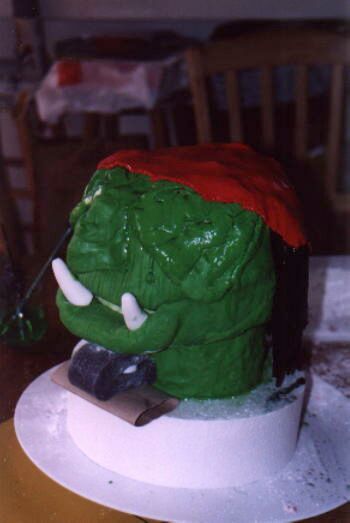
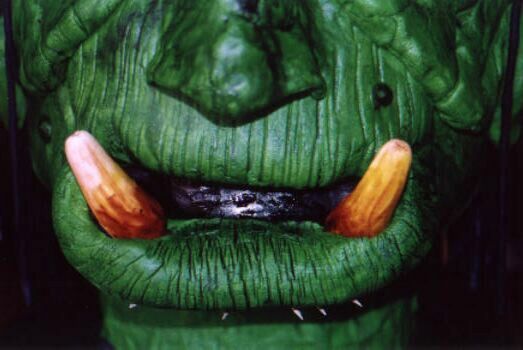
Filling Out the FacePlace the next layer of facial structures, again using temporary toothpicks to support anything that wants to slide away. That is, unless you're going for a melted face, like at the end of Raiders of the Lost Ark or something. Hrm...that gives me ideas... Hack at the structures with a blunt butter knife to make ridges, especially on the lips. In this case I added upper cheek portions (the ridges come from rolling out a large flat bit and then crumple-folding it, almost like adding pleats and then squishing that down). I also shaped some lower tusks and let them dry. I made a nice fat green lip and attached it (you can see it being supported by foam in the next photo), and put the tusks inside. I should have painted the inner mouth black first, but I forgot until after, which made it harder. So do that first! Then I made a big fat ugly nose and stuck it on with several toothpicks left inside to anchor it to the base. If you are making a cake for other people to eat, be sure to warn them about any internal-support toothpicks! Mind you, anyone who fancies eating a big, green, horribly sweet nose is probably asking for some kind of unpleasantness, eh? Once all of these features were on, I wet my hands and set about smoothing them together, almost as though I were modelling with clay. This also made the overall skin very creepy looking, which was nice. I live in a dry desert so I can count on it to dry in about 24 hours. If you live in a very humid area, this may be a bad idea. |
|
Back of the HeadCover the back of the head with more skin (this is also a good time to slap some skin on the neck). If you're putting on hair and/or a head covering, it doesn't have to be pretty, it just needs to serve as a base and something that might be partially seen through the hair. Do be sure to either meld it into the front face bits, or cover the seam with hair. Hair for something unkempt like an orc is easy: just roll out ropes of sugarpaste and attach them with water/sugar glue. If you're doing a human or something with nice hair, you'll have to put in much more effort to make it look nice. In this case, thick ropes look like nicely matted dreadlocks, and I deliberately varied the length for a rough-cut look. At this point, it looks like he has male pattern baldness, because I decided it was silly and wasteful to put hair where I knew the bandana was going to go anyway. Note the lump of dark gray foam and squashed toilet paper roll under the lower lip around the front. It kept sagging and toothpicks weren't enough, so I left that foam there overnight to help it dry in place. The toilet paper roll acted as a simple spring. |
|
Adding a BandanaRoll out a big piece of sugarpaste and plunk it down on the head to act as a bandana. A rough edge is perfectly acceptable for a rough dude like an orc. But again, if you're doing something nicer-looking, you'll have to take care to make that a nicely even edge. I actually should have first added more skin or skull or something to make the top of his head rounder, because it turned out too flat for my liking, and as the cake settled over a few days the dowels poked through the top. |
|
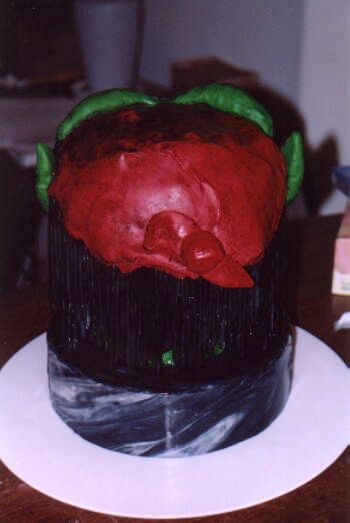
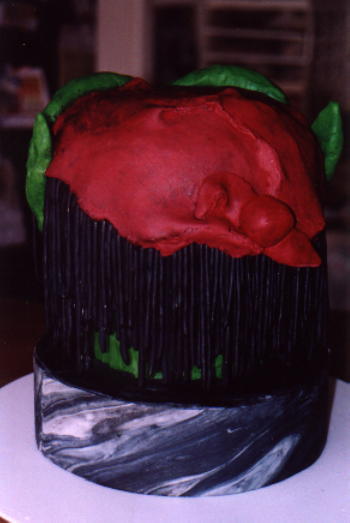
Putting on a Knot in the BandanaAdd a round lump and two roughly-cut triangles to form a knot in the back. I secured the lump with an internal toothpick. This photo shows how the hair line has been covered. Nobody will ever know that this orc has baldness issues. I got sick of the messy cake dummies at this point, so I mixed up some marbled black and white sugarpaste, rolled it out, measured it, cut it, and stuck it to the dummies to look like the head is sitting on a marble pillar of some kind. You can see the ears and brow ridge in this photo, but I'll describe how to do them in the next step. |
|
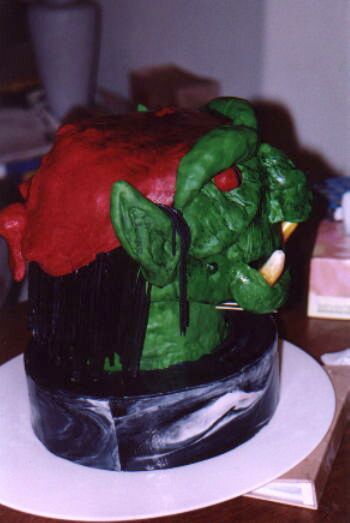
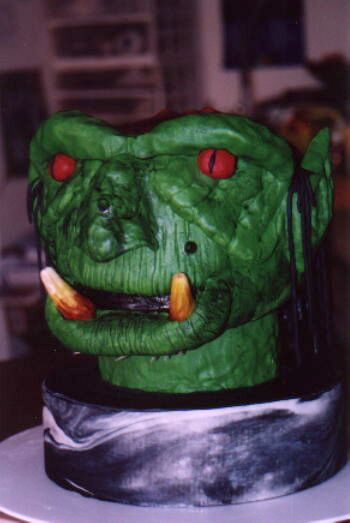
Adding Ears, Eyes, and Brow RidgeFor ears, make two similarly-sized lumps of skin sugarpaste. Lay them on your work surface and shape them at the same time, mirroring the shape and keeping the size the same. Use the tip of a knife to create indentations, and then pinch out and soften the edges of the indentations to form ear folds. If you're not sure how the ear folds are arranged, check out a real pair of ears, either your own or someone else in your household. Let the ears partially dry, enough that they don't squish when you handle them, but not so much that they'll crumble. Insert some toothpicks in the head where the ears will go, leaving enough out that they'll support the ears without poking through. Pick up an ear in your hand and cup your hand to give it a bit of a curve (some ears curve out, some curve in, I made these ones so the points curved out a bit), add a bit of water to the inside face, and then push it onto the toothpicks. Hold it firmly there for a bit. You can use ears to cover up seams. Adding a bit of extra hair on the front of the ear can also look good. The brow ridge in this case was simply a big long snake of green sugarpaste, hacked a bit to form some lines, and then looped over the head where the bandana's edge was. The eyes in this case were simply balls of red with a small black line added, tucked under the brow ridge. I'm actually not happy with them, and next time would put much more effort into detailed eyes. But I was getting tired and running out of time! You can also see in this photo that I have removed the foam and toilet paper roll from underneath the lip, but left in some long cocktail sticks to keep up the support, mainly because I knew I'd be transporting this to the ICES show. |
|
Finishing TouchesI stuck on some "warts" made out of slightly darkened green-skin-colour sugarpaste. Then I made a watery mix of black colouring and painted the whole cake with it, using a pastry brush. This let the colour settle into cracks, making it look more like creepy, dirty skin. It also removed any sugar dust from the hair, making it look much darker. Plus, it aged the bandana. I painted the lower portions of the tusks with a watery yellow mix and a small paint brush, and then, while that was still wet, mixed up some watery brown and painted that on the lower portion of the yellow. This makes the teeth look old and covered in tartar and other icky gross stuff. You'll find that pure white teeth on any head look stupid, unless you're one of those weird people who is into teeth-whitening. |
|
Eating the CakeProving once again that these cakes are for eating, here's a shot of a slice cut out of it. Looks pretty creepy, huh? Mmmmmmm...delicious violence... |
For another way to make a head cake, check out Barbara Jo's tutorial on how to make a Zombie Head cake.
Main Cake Page - Discworld Tutorial - Shelob Tutorial - Gummy Tutorial - Gallery - Books - Links
Use this link to view this page with my preferred colour and font settings.
Page last updated March 7, 2010.
Email me at crafts@kimberlychapman.com
If you want to receive notification of updates on any portion of this site, simply enter your email address here and click/select the button to enter. You will be required to sign up for a free Yahoo! account to complete registration. Please note that Yahoo!'s privacy policy and other management are outside of kimberlychapman.com's responsibility. Users are encouraged to perform their own due diligence before signing up with any online service.
To find out more about the list or read messages without signing up, please visit the Yahoo! page for the kimberlychapman updates mailing list.
For more information on what these tags mean, please see About KimberlyChapman.com.