 [d]
[d]Main Cake Page - Discworld Tutorial - Orc Head Tutorial - Gummy Tutorial - Gallery - Books - Links
[d]This cake was made for my husband's birthday in 2005. It is a very advanced cake. You will not be able to make this cake unless you understand the basic principles of working with sugarcraft, gel colouring, and figure modelling. This tutorial assumes a significant level of familiarity and does not go into beginner detail. It also takes at least two solid days of work; three to four is better.
Also, this cake requires a stable, clean, dry environment because of the fragility of the legs. Any area that is overly humid and/or does not allow overnight, uncovered drying of the legs will probably be unsuitable. If your work area has bugs or pets that will get into things left open, you will need to find your own alternative methodologies for drying out the legs.
If you do decide to make this cake, here's a list of what you'll need:
I strongly advise reading through this tutorial comprehensively before making the cake, so you will be prepared for the time and techniques involved. You will need to multitask, moving between various areas as certain things are left to dry with supports, so knowing everything that needs to be done in advance will help you manage your time efficiently.
Click on the pictures to see a bigger version of them.
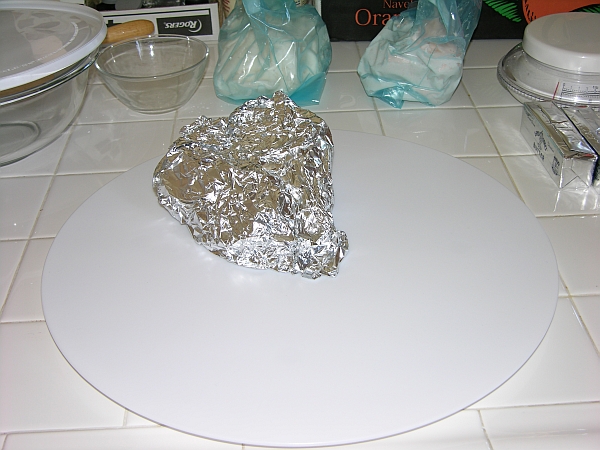
Preparing the Base (aka how to make fake stone)First, make a large wad of foil, fairly tightly compacted but still loose enough that you'll be able to jam cocktail sticks into it later. The wad should be somewhat wedge-shaped with a clear high end and low end, ramp-style. It should also be large enough to fully support the size of the ball cake evenly. To insure that it does support the ball cake and to make a nice indentation that will cup the cake, press one half of the ball pan down onto the foil. When you let go, try lightly tapping the bowl around the outer rim to determine stability. Adjust as necessary. Remember that since this will be rock, leaving it lumpy is a good idea. |
|
|
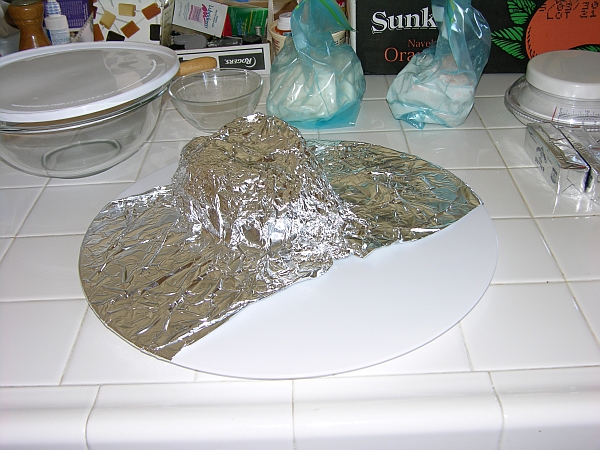
Place the wedge roughly where you want it to go. Next, wrap foil generously around the wedge and board with enough overlap to pinch the edges together underneath the cake board. Be sure to tuck the foil wrap in against the wedge tightly, and take time at this step to adjust the placement of the wedge if necessary. Wrap another long strip of foil around the wedge and board perpendicular to the first wrap to give the assembly added strength. If there is a bare spot left, either do another full wrap if you feel it's necessary, or add a smaller piece tucked in. If necessary, tape or otherwise affix the foil on the underside of the board. With my board, it was low enough to the counter to hold the foil stable on its own, although I did turn the board over to pinch the foil around the board's legs tightly so it would sit evenly without wobbling. |
|
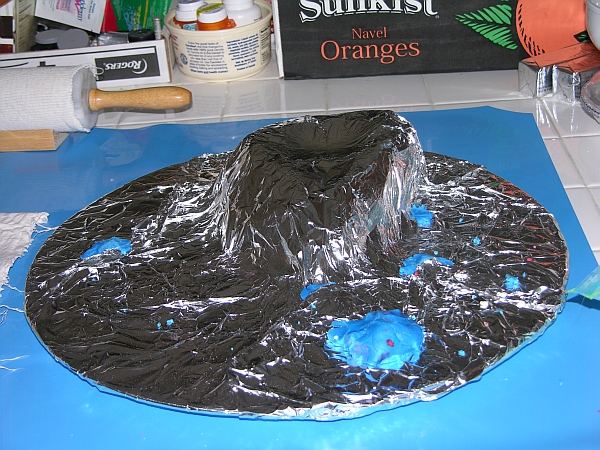
Place some lumps of sugarpaste around to serve as ridges, bumps, rocks, and to help stick the foil layers to each other. I used some old blue paste I had in the freezer that was too dry for proper modelling and that had been contaminated with small chunks of red. Don't worry about colour because whatever you put down now will be thoroughly covered up later. |
|
Roll out a batch of sugarpaste to cover the board. I used an old batch I had in the freezer; it had been put there because when I made it, I messed up the gelatin and it had lumps of gelatin in it and therefore was unsuitable for a cake that needed a smooth cover. It turned out to be good that I had saved it because the lumps added to the texture of this covering! Furthermore, I added some random lumps of other green and pale pink leftover sugarpaste. You can see small flecks of green in the detail photo. The batch I used was also fairly wet and pliable, so I was able to roll out it quite thin on a pastry cloth and transfer it without tearing. The fact that it was not stiff gave me plenty of time to play with the surface before it began to dry out and crack. Once the paste had been laid over the foil, I used my fingertips to press it firmly against all of the ridges. It overlapped itself a little bit behind the wedge, but again, since rock is random, I just let it get lumpy there. I deliberately pushed hard with my fingertips in order to leave indentations. To better randomize the indentations, I frequently turned the board and pushed again, often just poking my fingers all over as if I was giving it a massage. Still, I was careful not to push too hard and risk tearing the sugarpaste. When trimming the excess around the board, I left a generous overlap. Then I pinched the overlap underneath, smushing it into the ridges of foil there to more or less hold it in place. Again, the relative softness and pliability of this particular batch of sugarpaste helped; there was no cracking or splitting around the edge. To firm the edge up, I did more finger-poking all the way over the edge. To add more surface detail, I took a handful of food-safe paintbrushes, gripped them so their rounded wooden ends were pointing down, and randomly dabbed them all over the surface. I was sure to continually change their position in my hand and keep turning the board to avoid inadvertently making a pattern. After covering the board in small dents, I then went back over it with a gentle finger-poke to soften some of the edges of the narrow dents. When manipulating the surface, be sure not to forget all of the contours of the wedge and any rocks/lumps. At the end, you should have something that looks vaguely lunar. |
|
The next step is to apply gel colours to the sugarpaste to make it look like stone. BEFORE you put anything on your base, however, get a scrap piece of sugarpaste, texturize it with your fingers and the paint brushes, and run a test. You may even wish to run several tests. Having been in a ceramics studio for over a year, I took to calling these my "test tiles". Here is the combination I found that worked best for the particular shade and type of stone I was going for in this instance (different stone will have different colours, and your brand(s) of gel colouring may also influence the outcome):
By the end of all of this, there were thick puddles in the deep indentations, but lightly coloured ridges in the high areas. The sugarpaste is very wet at this stage; if you touch it, your finger will stick to it easily and you might tear it. |
|
When making my initial test tiles, I accidentally discovered the secret to making something that's painted to look like stone actually take on a crystalline, rock-like quality. That secret is a dusting of powdered sugar. I found it because I was being impatient with the test tiles, not wanting to wait for them to dry naturally. I highly recommend performing the following step on your test tiles as well BEFORE doing any painting on your actual cake board. Put some powdered sugar on a small plate or in a small bowl. Dip a DRY pastry brush into the powdered sugar. Hold the pastry brush above the painted area in one hand and with your other hand, tap the back of the brush or your hand. Do not flick the brush, tap the brush end, or use any kind of sieve/sprinkler to apply the powdered sugar. The sugar must be applied in a dust very gradually, or you will get a lumpy, soppy mess. I cannot overemphasize that this step takes patience. I think I spent about half an hour lightly dusting the board, and then a few more light dustings over the next hour as it dried. Apply only enough sugar such that it starts to collect on the high points of the stone, as in the picture. Do NOT cover everything with white. Once the high points have become white, step back and wait a few minutes. If most of the white gets swallowed up by the liquid, apply more sugar. Keep repeating this until the white stays on the high points for at least a few minutes. You will eventually notice that the deeper pools are becoming swampy (see close up photo). Resist the urge to touch them or poke at them, as the colouring is becoming thick and syrupy as it dries, and any touching risks marring the surface. Furthermore, that swampy look is what will eventually dry to appear as vaguely crystalline rock. Do not worry about little piles of powdered sugar that collect here and there. You will be taking care of them in the next step. Once you have applied the sugar to your satisfaction, leave the board to dry. Do not attempt to hasten drying by blowing air on it, or you will ruin the effect. Mine took about an hour, and I live in a very dry desert. If you live in a humid area, it might take overnight. Do not cover it or it won't dry. As it dries, if necessary/desired, tap on more sugar in particularly wet areas. But do so sparingly and cautiously. |
|
Once the surface is dry (it might stay glossy in places, so to check, poke a toothpick gently into the deeper puddles and if what's there is sticky/goopy, wait longer), take a clean, dry pastry brush and GENTLY brush the entire surface. This will remove the thick piles of powdered sugar from the high areas and take some of the gloss off of puddles. If you encounter areas that are still a bit sticky, dust on some more powdered sugar, wait for them to dry, and continue. This must all be done slowly, with patience, often stopping to let deeper areas keep drying. When you have finally cleared the surface of most of the loose powdered sugar, get a small cup/bowl and put a dribble of water into it. Dip the very ends of your pastry brush in the water and then immediately shake the excess off, or brush the excess off on a towel. The brush should be very slightly damp but contain no visible drops of water. LIGHTLY brush the surface of the rock with the damp brush, rewetting it as necessary. This will remove any lingering dust, further highlight the high ridges, and give a slight sparkle to the deep areas to make them more crystalline. |
|
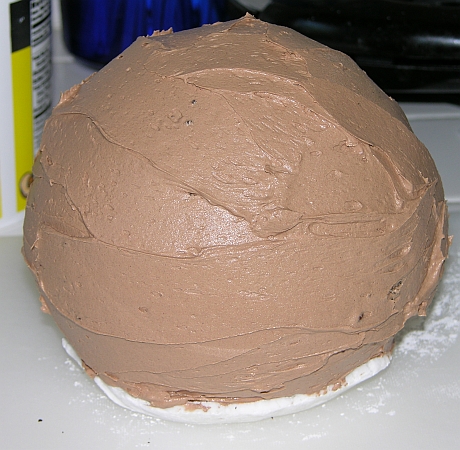
Making Shelob's BodyFirst, bake the cake in the Wilton Sports Ball pan. Cool completely. Level off each half. Take a small piece of sugarpaste and roll it out to about palm-size. Take half of the cake gently in one hand, round side up, and spread a layer of buttercream on the top of the dome. Turn this half upside down upside down and position it roughly in the middle of the palm-sized bit of sugarpaste on top of a clean cutting board. Put more buttercream on the curve, then bring up the edges of that sugarpaste to more or less smoothly cover the bottom of this half. This is done because I have found it nearly impossible to smoothly surround an entire ball with sugarpaste. Continue spreading buttercream on the lower half, including a generous layer in the middle. Put the upper half on, spread buttercream all over. Leave to sit for a few minutes, just long enough for the buttercream to firm up a bit. Meanwhile, roll out your sugarpaste on whatever you usually use (I like to use a pastry cloth on top of my silicone mat). Bring the cutting board with the cake over and apply the rolled-out sugarpaste. Proceed as gently as possible to cover the cake as far down as you can without incurring folds. Wherever the sugarpaste wants to fold, stretch it out to lay flat. This will cause a fold nearby, so work your way around slowly to manipulate it as smoothly as you can as far down as you can, overlapping the bit you've already put on. Affix the main layer to the base layer with a bit of water. Smooth the whole ball. I didn't use cake smoothers because I find them fairly useless on a sphere. Don't worry too much about occasional dimples or folds, especially on the underside, as Shelob is a pretty lumpy sort of girl. Let the cake sit for awhile until it is firm enough to pick up gently in two hands. |
|
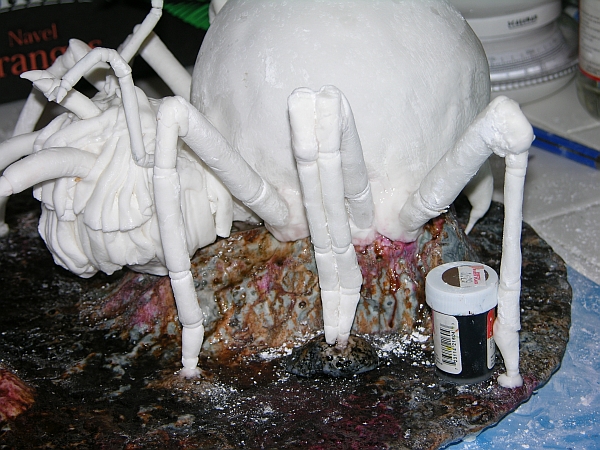
Place several sturdy cocktail sticks in the indentation where Shelob's body will sit. I used four and the cake never shifted or moved. However, when I placed only four for the head, it proved to be insufficient. But I'll get to the head issue in a minute. Wet the indented area slightly. Bring the cutting board with the cake over to the base. Gently but supportively lift the ball cake up and position it above the cocktail sticks. Let the bottom rest on the sticks, then gently lower it, allowing the weight of it to cause the piercing and fall. Once applied, give it a brief, gentle push down to make sure it is positioned properly. Make a ball of foil slightly smaller than you want the head to be, proportionally speaking. Cover it with sugarpaste similar to how you covered the ball cake, omitting the buttercream layer. Don't worry at all about bumps as you'll be covering it with further layers anyway. Place cocktail sticks in the appropriate place of the wedge. I put four in, but I think in retrospect there either should have been more or the front ones should have been angled backwards, as the head fell forward shortly before serving. Place the head down on the cocktail sticks. Affix it to the body with a rope of sugarpaste and some water. |
|
Mould a stinger with a wide base that can be affixed to the spider's body and blended in well. Place a couple of supporting toothpicks into the body where the thick part of the stinger will hang. Wet both surfaces and attach the stinger, blending in as much as possible. Don't worry too much about it being perfectly smooth, since it's okay for Shelob to have a bit of sags and folds in her big behind. Depending on the weight of the stinger, you may need to place supports while it dries on. I didn't have to, although I did have to push the whole thing up a couple of times which added some fatty-looking folds. Mould two little pincer-things and set them aside to dry. When they are dry and the stinger area is also dry, attach them with bits of thin toothpicks or wire, plus some wet sugarpaste. They will likely need to be supported to dry for some time. |
|
|
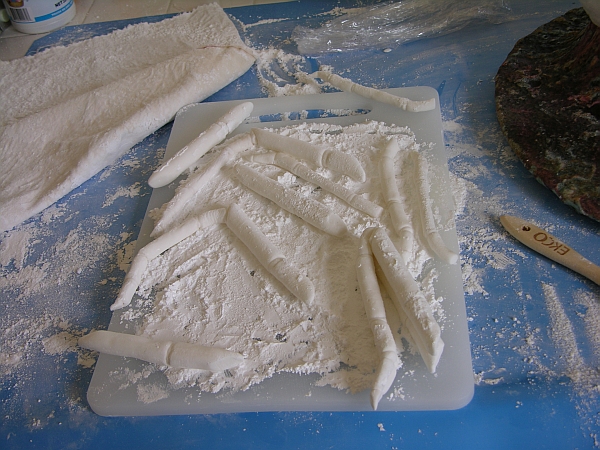
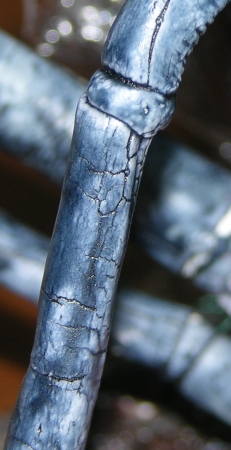
Making and Attaching LegsAssembling the legs requires a lot of patience, modelling skill, and time. They will need to dry thoroughly in open air in a dry environment. I let mine dry overnight in a desert climate and that worked fairly well. The legs are comprised of toothpick-supported sections with little balls jammed between to make the joints. In order from body to tip, the measurements of the sections are: one inch, three inches, slightly curved one inch, two inches, one inch, tapered 3/4 inch, and a small toe spike at the end. The "thigh" (from the body to the main knee) should be thicker than the "shin". I didn't actually measure the thickness, but I cut all of the thighs from a few similarly-sized rolls, and then I made the shins from a second set of smaller rolls. If you are in a dry area, I recommend assembling all of the thighs first, then proceeding onto the shins, which gives you more time to work with each little piece before it starts to dry out. As seen in the photos, the thighs begin and end with an angle cut, facing in opposite directions so one angle will fit against the body and the other provides a surface on which you can attach the shin. Breaking toothpicks as necessary, make sure each piece is at least partially supported by wood, and that every joint is fully supported. Be sure to use enough water to mush the joining ball between the sections, but not so much as to soften the leg bits. Some legs can be fully assembled, thigh and shin, and set to dry overnight. Others should remain as separate thighs and shins so they can be built on the fly as they fit on your board. In the case of tightly bent knees such as in the third photo, there won't be enough toothpick in there to support the knee. You will have to cram in some extra under-knee support to hold the shin away from the thigh and make the entire unit stable. MAKE EXTRA LEGS. It is quite likely that some will break during assembly and you don't want to have to wait for new ones to dry out. All legs, in pieces or assembled, should be set to dry on a thick bed of powdered sugar. Otherwise water will slowly drip down and glue them to the board you're working on. Some of the sugar will meld onto the legs, which would be a problem if old Shelob wasn't so cancerous and lumpy anyway. |
|
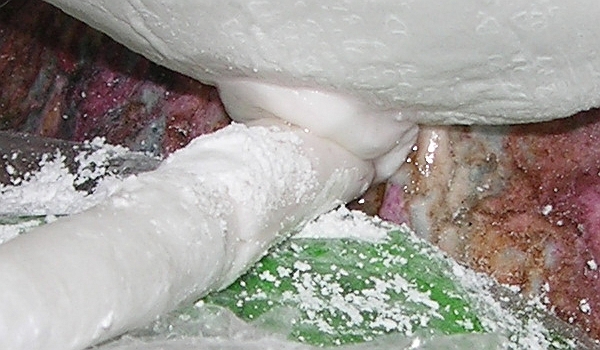
Do not attempt to attach legs that are at all soft. They WILL break and fall apart. This cannot be rushed. Put the legs on in an order that makes sense for you depending on your handedness. In other words, do not place a leg first if it will mean your dominant hand will have to work around it later and risk bumping it. Also, it is wise to start with inner legs and work outwards as opposed to leaving middle legs to the end, for the same reason. Carefully hold a leg in place so you can gauge where the attachment points need to be. I would have liked to have one or two of her legs up in the air threateningly, but I decided that was unlikely to work. Once you've decided on leg placement, mentally mark where the thigh and toe will connect to the body and board respectfully (or use actual small marks if you must). If needed, add new rocks to hold up the toe. If the thigh and shin still need to be assembled together, eyeball the appropriate angle and attach them likewise, setting them aside to dry for about an hour, then move on to a different leg placement in the meantime, or to working on some other step. To attach a leg, first get a ball of soft sugarpaste and knead it until it is fairly sticky and warm. Wet the body and base around where you will be attaching the leg. Jam the gooball on there, blending it on tightly but leaving enough of a gob to sink the bottom of the leg into. Then make a very small but similarly soft gob and place it where the toe will go. Place a toothpick in the large gob at an angle where it will go up into the leg. Eyeball where that will pierce the angle-cut on the leg, and poke a hole there. If you don't poke a hole in the hard leg, the toothpick in the fresh gob will just sink into the body and not support anything. If necessary, you can reverse this, putting the toothpick in the leg and poking a hole in the gob. I just found that it worked best with the toothpick in the gob first. Gently brush any loose powdered sugar off of the leg. Carefully but firmly place the leg so you are simultaneously pushing the thigh down into the big gob, the toothpick there up into the thigh, and the pointed toe down into the mini gob on the board. The toe gob will not provide much support on its own, but it will help keep the leg still. If necessary, quickly but carefully place any supportive structures needed to hold up the inner thigh or keep the whole leg from tipping over. Some legs will need more support than others. When in doubt, put up a support. Once a leg falls off it could break and/or damage other structures. Supports should be left in place until the leg is absolutely firm. Supports placed anywhere where the leg may be damp must have enough powdered sugar on them so that they won't stick to the support when dry. NEVER work directly beside a leg that is still drying. Move to the other side or work on something else. Do not jiggle the board while anything is drying and being supported. |
|
Making Shelob's HeadFirst assemble the pincers so they have time to dry. As with the legs, roll out a thin roll of sugarpaste and cut it. The approximate sizes I used were, from head to tip: 3/4 inch, 1 3/4 inches, 1/2 inch, 3/4 inch, and a tip moulded to make two pointy bits. As with the legs, you'll be attaching the rolls with soft little balls, but there's a difference this time: toothpicks are too big to fit in these narrow tubes, so I used a strip of 22ga floral wire. This gives contiguous support but requires more manual dexterity in assembly. Start with more wire than you need. Making sure the wire is as straight and kink-free as possible, slide the longest piece into the middle carefully, trying not to widen the hole. Using needle-nosed pliers, bend the wire in the appropriate angle above that tube. Push a small ball of sugarpaste around the wire (I found trying to slide balls down the wire didn't work; they fell apart) and blend in the seam as much as possible. Attach it to the tube with water. Slide on the next segment. Repeat this process to the tip, cutting the wire off with only a tiny amount left before placing the tip. Then, from the bottom end, do the same to slide the lowest segment into place but leave a long amount of wire there to be inserted into the head. Avoid bending the wire much once things are in place, as this will mangle the tubes very quickly. If the unit is twisted, you may be able to gently fix it. If not, you may have start over again. If there are small gaps, leave them for now and patch them up only when the piece is dry. Once you are happy with a pincer, insert the bottom wire into something that will support its weight and let it sit up to dry. |
|
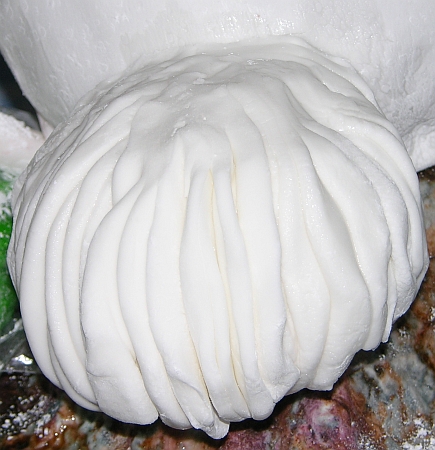
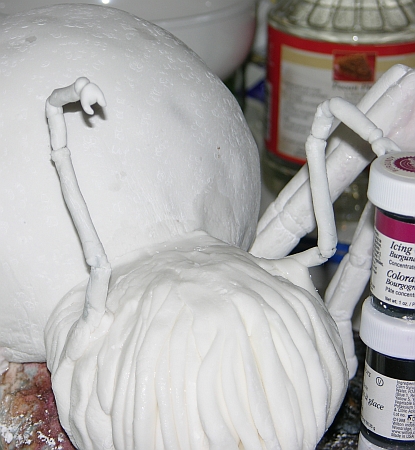
To make the folds of Shelob's head, first roll out a very thin of sheet of sugarpaste. Cut it so it has a sort of even bottom, and then fold it accordion-style, not being particularly even about it, pinched together at the top. Dribble on some water between the folds to get them to stick together. Hold it up to the head and cut the top as necessary so the bottom will hang fairly low on the head (but not the absolute bottom). Using a pastry brush, wet the entire head. Affix the folds onto the head, mushing the top back towards the neck and gently pressing the lower folds so they stick. Repeat as necessary around the head. Let this assembly dry enough to become strong, but not hard. |
|
When the first layer of head-folds are relatively firm, attach the pincers to the sides. Using the needle-nose pliers to grip the wire, shove it firmly into the side of the head, penetrating the sugarpaste and foil within. While supporting it there, bind it on with more sugarpaste, trying not to smush the head-folds. Put enough support underneath it to hold it up. If necessary, place temporary support structures. One of mine needed to be held up for a long time, the other was self-supporting from the start. Let them dry well before proceeding to any other step on the head. |
|
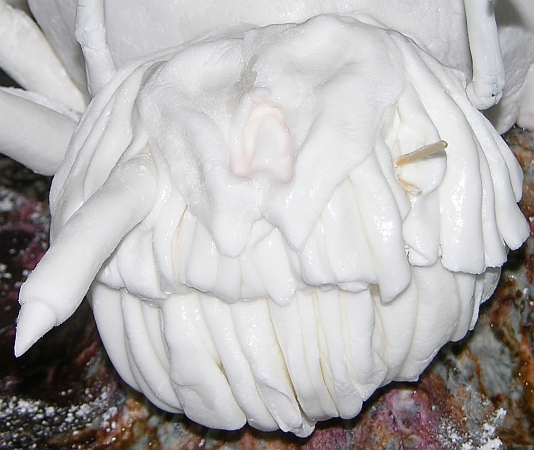
Once the head is stable enough to continue work, add another layer of fleshy folds as the first one, but this time make them shorter and only from the top forward, not going over the pincers at the sides. Decide where the lower tooth tubes will be, and gently separate the folds there to leave a gap. When that second layer of folds is fairly firm, make another thinly rolled bit of sugarpaste and this time cut it into a heart shape, but cut out the bottom tip of the heart in an inverted V. Apply water to the back of this with a pastry brush. This will make it extremely soft, so you will have to work quickly and with skill to attach it. Put it on the fleshy folds in the middle as shown in the picture. Gently pinch up ridges just inside the edge, bringing those ridges to points on the two bottom points of the shape. With your thumbs, gently push indentations into the top as shown in the picture. With a very sharp, small knife, cut Shelob's mouth. To be blunt, her mouth is rather like the top of a vulva, so if you're familiar with that part of human anatomy, shape it likewise. I cut two slightly diagonal slits, then a curved bit between them at the top, and then gently lifted the layer of sugarpaste up on the outside of the cuts. With the end of a small paintbrush, I gently formed the inner bump that ramps down, creating deeper indentations on either side at its bottom. Use the brush part of the paintbrush with a bit of water to smooth out the construction, but be sure not to use so much water as to erode it. Let the assembly dry enough to become slightly firm. Meanwhile, shape four tooth tubes. Make two slightly longer and fatter than the others, and put a curved-down point at the end of each. Let these dry to hardness. |
|
When the tooth tubes are dry and the face is firm, insert toothpicks into the face where the tubes are to go (the lower tubes go into the places where you parted folds earlier, the upper tubes go into the indentations in the heart shape, above the mouth). Poke holes in the tubes to match. Wet the areas to be joined and add a bit of soft sugarpaste, then attach the tubes. They may require supplemental toothpicks underneath to hold them up while they dry into place. Make eyes by forming small cones of sugarpaste. Roll out a thin sheet of sugarpaste and cut it so it will cover the top of the heart shape and go back to the neck. Place the eyes, then drape the sheet over top, allowing it to rest on the backs of the cones. This will give her the appearance of beady eyes. I may have made her eyes too friendly, so you may wish to consider adding wrinkles or more angry-looking lids. Use the end of a paintbrush handle to make three small indentations between and just below the eyes. With a round stick, such as a paintbrush handle, indent the top of this last sheet of sugarpaste several times in lines that sort of follow the flesh folds underneath, but leaving a ridge in the middle (see completed photos below for a better view of these ridges). |
|
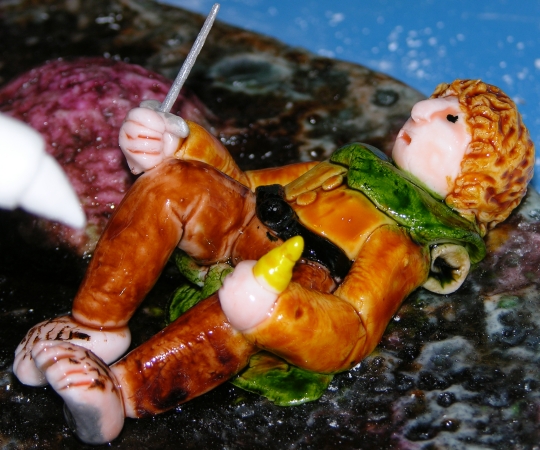
Making SamPutting a frightened little Samwise Gamgee (or maybe even Frodo) adds to the overall narrative, but is otherwise optional. However, it's a good thing to work on while other parts are drying. Because this tutorial assumes you can model basic figures, I haven't made a step-by-step guide to constructing a little man. Just be sure to size him appropriately (this Sam is about three inches tall). He was built on a cutting board off to the side and attached when he was dry, then painted on the board. His sword is a toothpick painted with non-toxic silver acrylic paint, since I knew he would not be eaten and I am not a fan of spending a lot of money on edible lusters. If I'd had significantly more time, I would have considered rigging Sam so that instead of a sugarpaste bottle of Earendil, he'd have a miniature light in his hand and then burying the cord through the structure to some kind of power source hidden under the board. But a) I don't have any little model lights around, let alone power sources (although I know I can buy them at hobby shops), and b) there simply wasn't time. If anyone does do this, please send me a photo! |
|
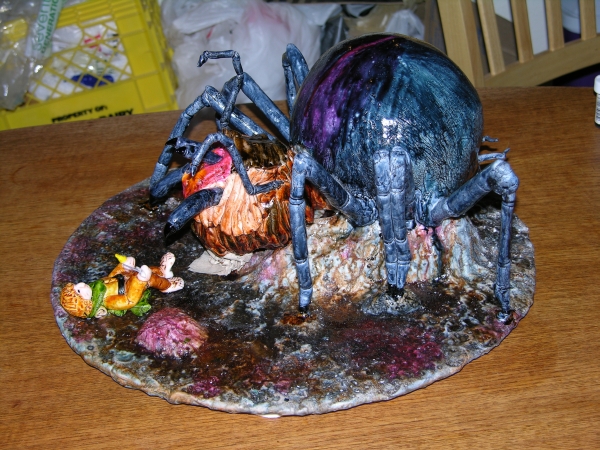
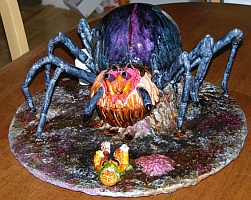
Painting and FinishingUse a dry, clean pastry brush to sweep off any powdered sugar that has accumulated on the base during construction. If necessary, repeat the early step of using a barely-damp brush to bring the highlights back out again as well. Once the modelling is all done and fairly dry and stable, it's time to paint the spider. This tutorial assumes you are familiar with how to apply gel colouring paint to sugarpaste, including allowing seepage into folds and cracks. I started with the fleshy folds of the head, doing the lower level with slightly watered-down brown, and more watered-down brown for the upper level. The middle heart/mouth area was painted with watered-down burgundy and highlighted on the folds with yellow, with a lot of blending. I let some brown and yellow mix dribble down the sides of her mouth to gather in the folds there. Some of that mix was also lightly dabbed into the three holes between her eyes. The skin above the eyes was painted a mix of black and brown, and the eyes were painted with full-strength black gel. Because as mentioned before black gel colouring is actually dark green, mix a generous amount of black with dark blue and a lot of water. Paint this colour on the underside of Shelob's head (below the fleshy bits) and all over her legs and body (use a small brush on the legs and a pastry brush on the body). While the big round part of her body is still wet, add some watery burgundy to paint in a line up the middle front, blending it out to the sides a bit. Also use the blue-black mixture on the head pincers and tooth tubes, and to highlight the ridges of the lower level of flesh-folds on the head. Paint the pointy ends of the tooth tubes with full-strength black. Blend the toe supports into the rock base using similar colouring at each site. Paint her toe claws and stinger with full-strength black. Much of the paint will run down and pool on the rock base. You can carefully mop up some of it with a paintbrush or tissue, or leave it as additional rock features, as suits you. It amused me that the stuff coming off of the head made it look like Shelob was drooling. Painting makes the sugarpaste soft, so keep an eye out for legs and other structures that may start to sag. One of the back legs in my case kept falling off, so I had to re-stick it and position supports once more for it to dry (which can be seen in the first photo, towards the back). Somewhere between modelling the head, insufficient supports, and the paint, the head fell forward after the first picture before I had a chance to take more pictures, which is why the rest of the pictures show a break in the neck and a napkin holding the head back up in place. |
|
These photos illustrate how much better the paint job looked the next day. I didn't have time to let mine dry because I finished painting about half an hour before my guests arrived. However, I recommend allowing about 24 hours of drying time for final firm-ups of all objects, plus for the paint to dry. While the glossy look can be nice, I prefer the matte finish of dry paint. Some folks mix gel colours with vodka instead of water for faster drying, but since I do not ever consume alcohol in any form, I never do this. |
|
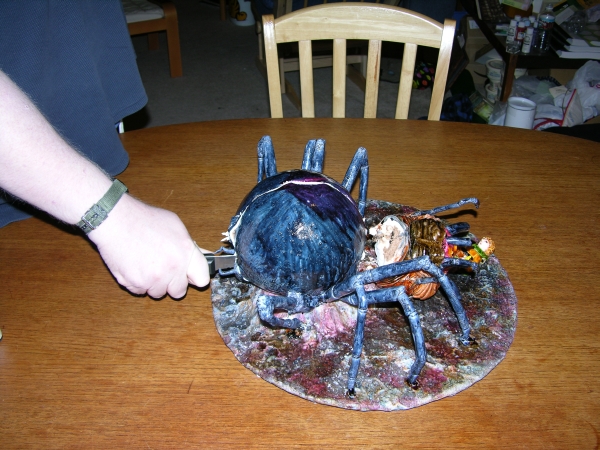
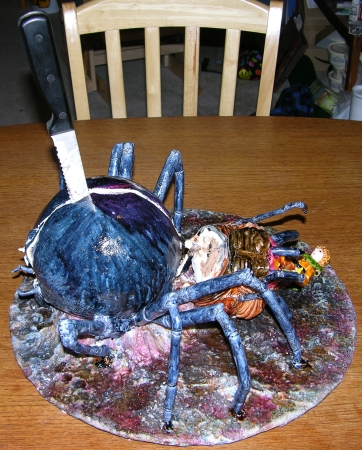
Here are some photos of the cake being cut and destroyed. That's one of my RPG friends doing the cutting. |
Main Cake Page - Discworld Tutorial - Orc Head Tutorial - Gummy Tutorial - Gallery - Books - Links
Use this link to view this page with my preferred colour and font settings.
Page last updated March 8, 2010.
Email me at crafts@kimberlychapman.com
If you want to receive notification of updates on any portion of this site, simply enter your email address here and click/select the button to enter. You will be required to sign up for a free Yahoo! account to complete registration. Please note that Yahoo!'s privacy policy and other management are outside of kimberlychapman.com's responsibility. Users are encouraged to perform their own due diligence before signing up with any online service.
To find out more about the list or read messages without signing up, please visit the Yahoo! page for the kimberlychapman updates mailing list.
For more information on what these tags mean, please see About KimberlyChapman.com.