


All beading graphics on this page were created by Kimberly Chapman, and are my exclusive property. Feel free to link to this page, but please do not steal the graphics and pictures. It took hours of work to make them. If I find them elsewhere on the Internet, I will consider pursuing legal charges against the site owner.
This is the stitch I know best. I had trouble learning it because the instructions I found were very poorly drawn in flat, undetailed graphics that confused me (see my beading books section for more information on which books had good or poor instructions). So in putting together this part of my site, I decided to scan actual beads and stitches to try to help instruct others. I don't usually use black thread; that's just for contrast. I've drawn blue arrows to indicate the direction of the thread and/or needle, and sometimes the thread loops offscreen, so just imagine it via these arrows.
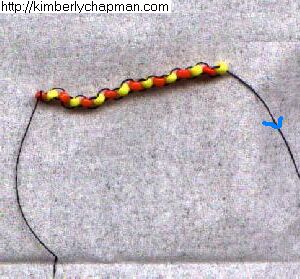
This isn't a pattern of any sort, it's just some beads strung together to demonstrate building the ladder, increasing and decreasing in varying numbers. Once you learn this stitch, it's very easy, but it takes a bit of practise to learn how to hold the bits so they all go where you want them to. Remember: don't pull any of it too tight because it'll curl, but don't leave it too loose or the beads will jump between loops and make a mess. If something goes wrong, take the needle off of the thread and pull off the beads back until it looks right, then start that part again.
This is the page with reversed pictures for left-handed people. I am right handed, so I did the best I could in reversing everything to make it easier to follow. If you are right handed, you'll probably want to use the original instructions.
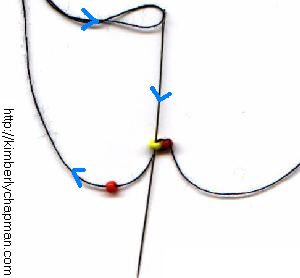
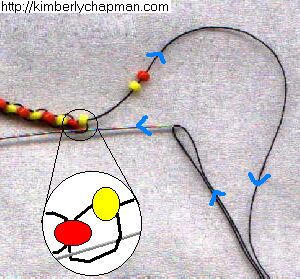
The Ladder RowStart by tying a bead on the thread. When you're more advanced, you'll want to use a slip knot that you can undo later and weave the tail into the piece, leaving no starting mark. While you're learning, though, this is a pain in the butt because you might push beads off the end of the string. So for now, tie a triple knot to hold firmly. Once you've got the first bead on, put the needle through it so the thread is actually going through the bead. |
|
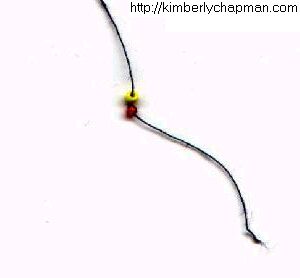
Put the next bead, according to your pattern, on the thread. I've used red and yellow beads to try to make each one clear. |
|
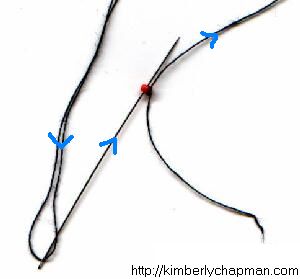
Now loop around and put the needle back through the bottom of the first bead, forming an overall loop through that first bead that holds the second bead on. Pull the loop closed, and the second bead should line up alongside the first one, as shown in the next picture. |
|
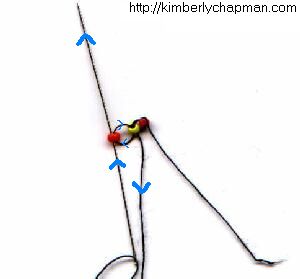
Continuing in the same loop direction, now put the needle down through the second bead. |
|
Your first two beads are now looped together, with the thread coming out the bottom of the second one. Add your next bead. |
|
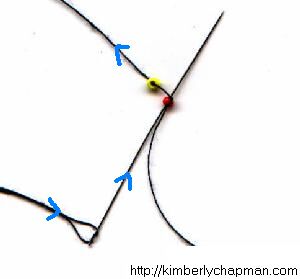
As before, loop back through the previous bead (the second one, in this case). Notice that on the red bead, you came up from the bottom, but on the yellow, you're coming down from the top. These reversing loops will form the ladder as you continue. |
|
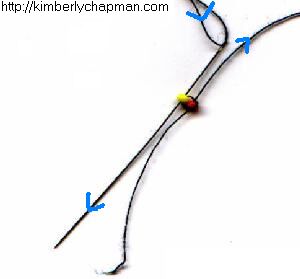
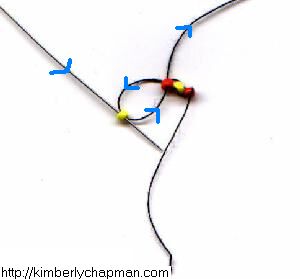
Pull the first part of this new loop closed (I've left it a bit loose here for demonstration), then go back UP through the new bead. |
|
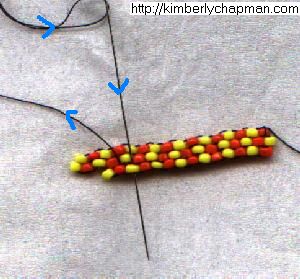
Add another new bead, then make your loop through the previous one and back through the new one. Do this repeatedly for the entire length of your base row. The base row will usually be the bottom or top row in a square piece, but in other shapes it will likely be the widest row (because as you'll see, it's easier to decrease than increase). When you have finished the ladder, flip it over to begin the next row. Arrange it so the thread is pointing down for this example; but you may find it easier to work with it upwards, depending on preferences. |
|
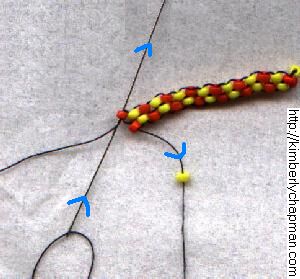
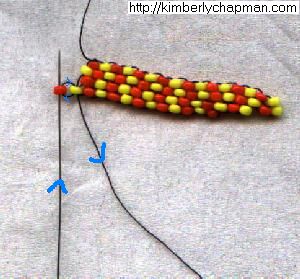
Second Row and IncreasingNow you're ready to start the next row. For this example, we're going to make the second row an increase on both ends, meaning it will stick out by half a bead on either side. We'll learn about decreasing on the third row. |
|
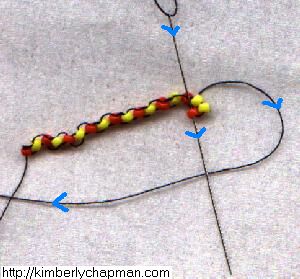
Add TWO beads to the thread. Put the needle through the THREAD loop between the last two beads on the first row (see magnification). Be sure to keep this loop fairly tight in your fingers so as not to allow the two new beads to slip under it. You want the thread to go through it, but NOT the beads. |
|
As you pull the thread snug (but not overly tight!) through this loop, the two beads will fall side-by-side. If they don't, give whichever naughty one is out of line a little nudge and it will fall over. Now put the needle down through the SECOND bead only. This is forming a new loop interlocking with the one from the previous row. |
|
Pull the thread snug (but not overly tight!). Your newest two beads should now be snuggled up to the first row, slightly askew in the brick pattern. Don't worry if they're not exactly on the half-marks of the beads above; they will shift over as you add more beads to this row. |
|
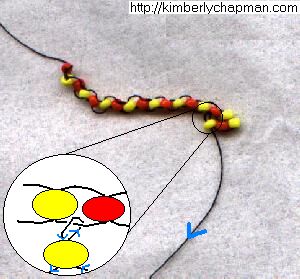
Add your next bead. Put the needle up through the THREAD loop (not the beads) on the first row, then back down through your new bead, as shown in the magnification. You're forming new loops that interlock with the loops you made on your ladder. |
|
Continue adding beads and looping back through the first row's thread loops. Do this until you run out of thread loops on the first row. |
|
If we wanted to have the same number of beads in both rows, we'd stop here and go to the third row, adding two beads and doing the same thing over and over again. But since we're making this row increase on both ends, we need a place to anchor an additional bead. So add your next bead, then put the needle up through the end BEAD of the previous row. There's no thread loop, so go through the bead itself. |
|
Now put the needle down through the bead you just added. The thread will appear on the outside of the upper row end bead. |
|
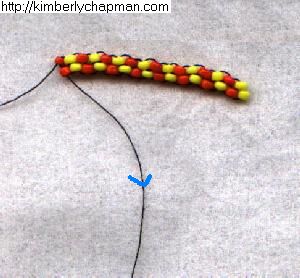
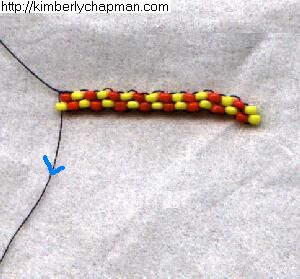
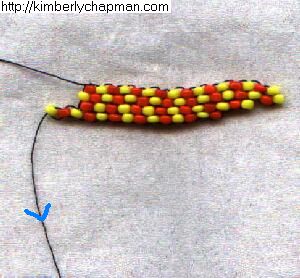
Pull the thread snug, and there you have your second row! Flip it over to begin the third row. |
|
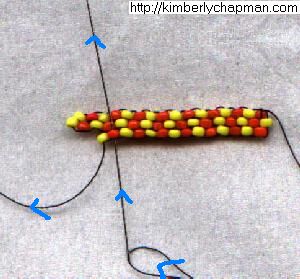
Third Row and DecreasingOn this row, we'll decrease at either end. To begin, don't put two beads on as you did when you were increasing. Put only one on. |
|
Make a loop through the first available loop of the previous row, as you did along the row previously. Go back down through your new bead, and pull it up snug (but not too tight) to the previous row. |
|
Continue along, adding beads and going through the previous row's loops just as you did before. For our example of decreasing, leave the last two loops of the previous row blank, in other words, don't stitch beads on to them. This means we're decreasing by two beads on this side. |
|
Let's decrease the next row by two as well from this side. You could just put the next bead on and skip the first loop, but that looks messy in my opinion. Instead, you want to feed the thread back through so it's coming out in the appropriate place. So put the needle back up your SECOND LAST bead. |
|
Now put the thread back down through the THIRD LAST bead. If you were going to decrease by more than two, you could thread up further through the piece to get back down on an angle through the appropriate starting bead. Don't just skip beads, or you'll have loose thread hanging around. Also, feeding the thread back through the piece adds strength to it. Be careful, though, because previous rows may have a knot from added string, and thus may not accommodate a needle. You may have to play with it a bit through the rows to get it to come out where you want it. But in this simple example, just go back down as indicated. |
|
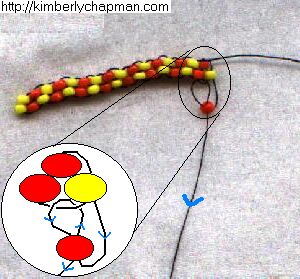
Fourth Row and Increasing ExtraFlip the piece over to begin the fourth row. From your new starting point, add beads as you did on the third row, all the way along. When you get to the end, increase by one as you were shown on the second row by going up through the last bead of the previous row. |
|
Let's increase further, beyond the point which we have beads on previous rows to anchor. Add your next bead. |
|
Loop back around to through the SECOND LAST bead, coming down in a round loop. Does this look familiar? It should: it's a new ladder. You're doing exactly what you did on the first row, making circles of thread that pull the next bead on. |
|
As with the ladder, go back up through the bead you just added, closing the loop. |
|
Add another bead and loop it in onto the new ladder. You can continue this as long as you need to, but note that because it lacks support from a previous row, it will be floppy until you flip it over and add the next row. With these basic techniques, you should be able to adapt to any flat brick stitch pattern! Remember to start in the widest part of non-square or rectangle pieces, because it's easier to thread back through and decrease than to keep adding new ladders. Sometimes it will be necessary to add ladders, though, so keep this technique in mind. |
To finish, you can tie the thread to the end bead, but I prefer to use up the remaining thread and strengthen my piece by sewing it through the beads in their diagonal rows. Don't skip beads or you'll have a chunk of thread sticking out. Just stitch it through, randomly up and down if you like, until it runs out. If you do this through enough beads in the piece, it should be fairly well held and won't fall apart.
Use this link to view this page with my preferred colour and font settings.
Page last updated December 4, 2003.
Email me at crafts@kimberlychapman.com
If you want to receive notification of updates on any portion of this site, simply enter your email address here and click/select the button to enter. You will be required to sign up for a free Yahoo! account to complete registration. Please note that Yahoo!'s privacy policy and other management are outside of kimberlychapman.com's responsibility. Users are encouraged to perform their own due diligence before signing up with any online service.
To find out more about the list or read messages without signing up, please visit the Yahoo! page for the kimberlychapman updates mailing list.
For more information on what these tags mean, please see About KimberlyChapman.com.