


All beading graphics on this page were created by Kimberly Chapman, and are my exclusive property. Feel free to link to this page, but please do not steal the graphics and pictures. It took hours of work to make them. If I find them elsewhere on the Internet, I will consider pursuing legal charges against the site owner.
This lesson will assume you are comfortable with the brick stitch. As with the pictures for the brick stitch, I don't usually use black thread; that's just for contrast. I've drawn blue arrows to indicate the direction of the thread and/or needle, and sometimes the thread loops offscreen, so just imagine it via these arrows. I've also drawn in a red curved arrow to indicate which way the stitch is proceeding, even though sometimes it requires going back through a previous bead; this is the direction the beads are being added.
You can start the circular stitch using a slipknot, but I prefer to use either a gold metal ring in the middle (which looks nice but has the fault of a small opening through which thread can pass if you're not careful) or a larger bead. In this example, I've used an "E" size white bead.
If you are left handed and find these pictures hard to follow, please see the reversed photo instructions.
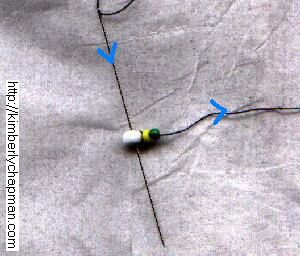
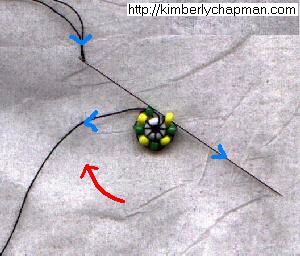
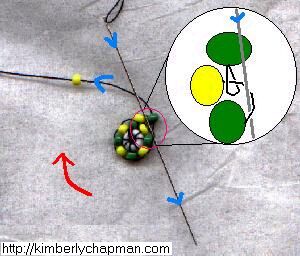
First RowTie the thread to whatever you're using in the middle; in this case, the white E bead. Unlike other brick starts, do NOT put the needle back through the E bead after tying it on. Just thread two beads. |
|
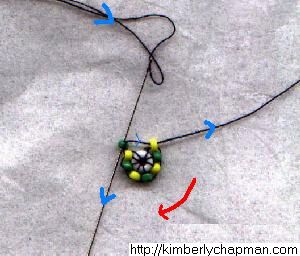
Go back down through the SECOND bead only. |
|
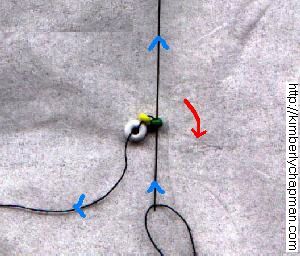
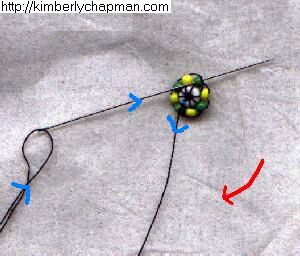
Loop the thread around the E bead much as you would if it were a loop on an upper row in regular brick stitch. That is, go through the E bead, then back up through the second bead. |
|
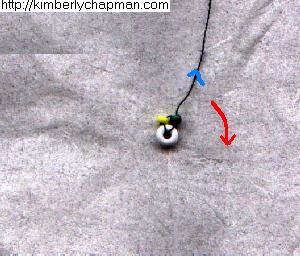
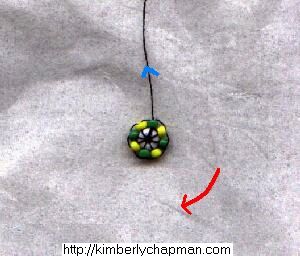
Add the next bead, and go through the E bead again, then back up through the new bead. Continue adding beads in this manner all the way around the centre bead. Choose your beads such that they get the best fit, as close together as possible while still being flush against the centre. It's better to have this row slightly stretched apart than bunched up so close that they won't sit in a circle. |
|
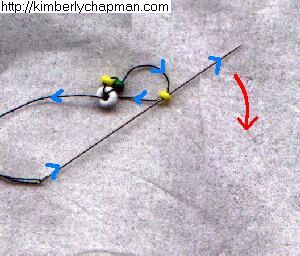
To close the circle of the first row, go back UP through the FIRST bead. |
|
Next go back UP through the LAST bead. |
|
Then, to anchor this last bead, go through the E bead again, and back UP through the last bead. |
|
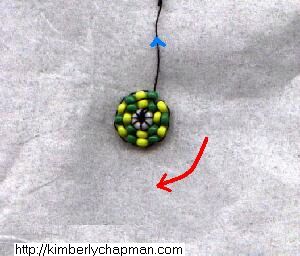
Pull it all snug, and you should have a good circular first row. |
|
Second RowAdd one bead. Stitch this on with the usual brick stitch method, going through the thread loop between two beads from the previous row. Select the loop to the side consistent with your beading direction. |
|
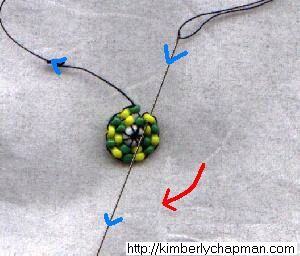
Add the next bead, and you'll probably notice that this pulls heavily to one side of the loop. That's fine, the next step will show you how to add a bead in circular brick stitch. |
|
At this point, if we add the next bead to the next loop, it's going to leave a huge gap. It's time to add a bead. So simply string another bead and stitch it to the same loop as the last bead. Do this throughout your piece as necessary. |
|
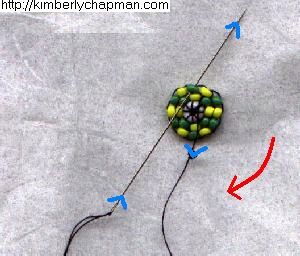
Continue adding beads until this circular row is completed. |
|
To close this circle row, go DOWN through the first bead of the row. |
|
Next, go UP through the last bead of the row. All subsequent circular rows will be like the second row, increasing as necessary. |
Use this link to view this page with my preferred colour and font settings.
Page last updated December 4, 2003.
Email me at crafts@kimberlychapman.com
If you want to receive notification of updates on any portion of this site, simply enter your email address here and click/select the button to enter. You will be required to sign up for a free Yahoo! account to complete registration. Please note that Yahoo!'s privacy policy and other management are outside of kimberlychapman.com's responsibility. Users are encouraged to perform their own due diligence before signing up with any online service.
To find out more about the list or read messages without signing up, please visit the Yahoo! page for the kimberlychapman updates mailing list.
For more information on what these tags mean, please see About KimberlyChapman.com.