 [d]
[d]
See the gallery for more photos.
Copyright © 2005-2008, Kimberly Chapman. All knitting graphics/patterns/instructions on this page were created by Kimberly Chapman. You may link to this page, but please do not steal/hotlink the graphics or copy the patterns to other sites without my written permission. Feel free to print graphics/patterns/instructions for personal or non-profit use, but absolutely no for-profit reproduction is allowed, including selling of finished items (except for registered charitable causes).
Yarn: Red Heart Super Saver in White, Red, Royal Blue, and Grey Heather
Needles: US size 3 double pointed needles (see my double-pointed needle tutorial to learn how they work)
Gauge: Gauge isn't highly important because the pattern is structured to help you make things fit, but as a rough guideline the gauge used in the pictured example was 4"= 22 sts x 32 rows
On TWO DPNs, CO 40 sts, 20 sts per needle. Leave a long tail (about 12") to sew up the bottom of the boat later.
Inc1 at each end of each needle (meaning you will add two stitches per needle (one at the start and one at the end), four stitches added per round) until each needle has 40 sts.
Next two rounds:
Inc1 at the start of each needle (41 41)
Inc1 at the end of each needle (42 42)
Repeat those two rounds until you have 50 sts per needle.
Purl 1 round.
Work K2, P2 rib for 3 rounds (this will simulate the railings on the deck).
BO loosely.
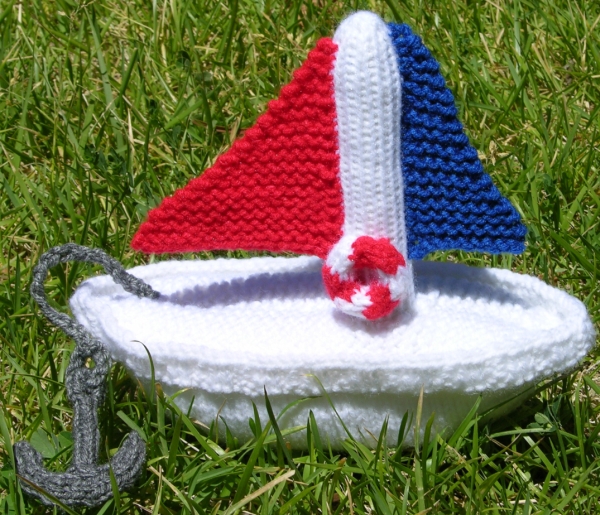
Sew up bottom edge of hull with the tail you left while casting on. If you want the bottom edge to have a defined point, hold the edges together, right side out, and oversew broadly and tightly. If you want more of a flat-bottom (as shown in the photo), turn the hull inside-out, hold the edges together, and either work a shallow oversew or any other edge-to-edge stitch you prefer.
Note that depending on the yarn used, you might need to adjust the floor length to fit your hull. Make sure you work the hull first and then hold the floor up to the inner, bottom edge of the railing occasionally to check for length.
You also have the option of making a boat with a centred mast or an off-centre mast. The photo shows an off-centre mast, but see the gallery for an example of an early prototype with a centred mast.
CO 2 sts.
Knit 2 rows.
Inc1 in all (4 sts)
Knit 1 row.
K1, inc1 twice, k1 (6 sts)
*Knit 1 row.
K1, Inc1, knit to last 2 sts, inc1, K1*
Repeat between *s until 14 sts.
Place marker (this will be used for remembering where the angled part of the floor ended and the straight part began, which will help you determine how long to make the floor as you hold it up to your hull).
For a centred mast, work garter stitch rows until the floor fits halfway along your hull, then work the hole as below. For an off-centre mast, work garter stitch rows to about 1/3 of the way along your hull (about 1.25 inches with the yarns and needles used in the example in the photo), then work the hole as below.
K6, BO2, knit to end
K6, turn
BO1, knit to end, turn
K5, CO1, turn
Break yarn (leaving several inches of tail for sewing the floor to the mast later) and restart on the inside of the hole, where you would have knit next if you had kept going
normally instead of binding off and turning.
K6, turn
K4, k2tog
CO1 and knit the cast st, K5
K6, CO2, K6
You should now have a full row of 14 sts again.
Continue working garter stitch, comparing to the hull regularly, and when it looks like the working edge is the same distance from the end point of the hull as the tapered end of the floor you marked earlier, begin decreasing. For the boat pictured with an off-centre mast, this was 3.5" from the hole's edge, so if your yarn and gauge match the sample, you would work the hole, then 3.5" of garter stitch, and then begin tapering as instructed below. If you centred your mast, a good way to tell if you're ready to decrease is to fold the floor in half at the hole; if your current row lines up with the marker you placed indicating the end of the first taper, then it's time to begin the decreases.
*K1, SSK, k to last 3 sts, k2tog, k1.
Knit 1 row.*
Repeat between *s until 6 sts remain.
K1, SSK, k2tog, k1 (4)
Knit 1 row.
SSK, k2tog (2)
Knit 1 row.
BO and leave a very long tail, long enough to sew the floor to the hull all the way around the edge.
Pin the floor in place on the inside of the hull just below the railing (the ribbed stitches). Sew on one side only for now.
CO 9 sts, 3 on each needle (3 3 3), leaving several inches of tail so you can sew this edge to the bottom of the hull later.
Knit rounds for 7".
Break yarn and pull through remaining stitches tightly.
Stuff the mast very rigidly, pushing all stuffing in as far as you can before adding more. Avoid lumps, and if you do get some, roll the mast firmly on a hard surface to work them out. If it remains lumpy, pull out all of the stuffing, fluff it up, and begin again.
Position the mast through the hole with the cast-on edge at the bottom of the hull. Pin in place by shoving a DPN up through the hull, into the mast, ensuring that it is at the proper angle. Sew the bottom of the mast to the hull, being careful to not pucker the hull's outer surface any more than necessary (ie do not do big, tight stitches). Push the tail you left when working the hole up through the floor so it is on the outside, but don't sew the floor to the mast just yet.
Finish sewing the floor to the hull, stuffing the boat (not too firmly, just enough to hold its shape when squeezed) as you go, ensuring the stuffing goes all the way around the mast and into the front and back corners of the boat. If the floor is too puffy-looking, you can flatten it out a bit by stitching evenly and lightly between the floor and the seam line on the bottom of the hull, but be sure not to pull it tight. The pictured example has the floor lightly flattened in this manner (you can see there is a very slight line running along the middle of the floor).
Now pick up the tail coming out of the floor alongside the mast and use it to stitch the floor securely around the mast.
CO 1
Inc1. (2 sts)
Knit 1 row.
K1, inc1. (3)
Knit 1 row.
K2, inc1. (4)
Knit 1 row.
Continue increasing in that manner (always adding the increase on the same side so one edge is straight and the other is angled) until the length is 3". Then BO so that the yarn ends up on the straight side, so you can cut it with a tail that you can then use to sew the straight side to the mast.
CO 1
Inc1. (2 sts)
Knit 3 rows.
K1, inc1. (3)
Knit 3 rows.
K2, inc1. (4)
Knit 3 rows.
Continue increasing in that manner (always adding the increase on the same side so one edge is straight and the other is angled) until the length is 3". Then BO so that the yarn ends up on the straight side, so you can cut it with a tail that you can then use to sew the straight side to the mast.
Stitch the sails to the mast as shown in the photo.
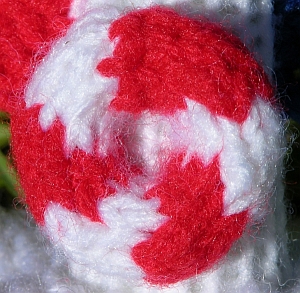
Life PreserverThis uses the same methodology shown in my Knitted Rings Tutorial, if you need further guidance on how to work the stitches. The wrapping method will be available on that page soon, but is currently available in the paid Knitted Alphabet pattern. If you don't know how to wrap short rows, you can just skip the wrap instructions.
CO 6 sts on 3 needles (2 2 2) in white. Change to red and repeat the above steps. Work a total of three white sections and three red sections. BO and stitch the ends together. Stitch onto the mast or wherever desired on boat. |
 |
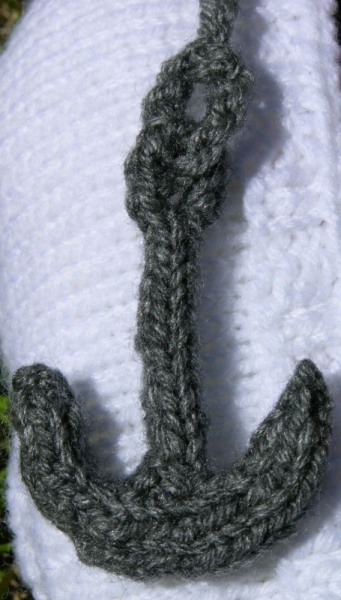
AnchorThis uses the same methodology shown in my Knitted Rings Tutorial, if you need further guidance on how to work the stitches. The wrapping method will be available on that page soon, but is currently available in the paid Knitted Alphabet pattern. If you don't know how to wrap short rows, you can just skip the wrap instructions. Curved Bottom
CO 1. Break yarn and pull through. Middle Bar
CO 4 sts on TWO needles (2 2) and leave several inches of tail for stitching to the curved bottom. Stitch this bar onto the centre of the curved bottom. ChainUsing a large crochet hook (I used a K, the largest I have), loosely chain stitch for the desired length, at least a few inches. Put one end through the top loop of the anchor and sew it in place, and sew the other end to the boat. |
 |

Use this link to view this page with my preferred colour and font settings.
Page last updated June 9, 2008.
Email me at crafts@kimberlychapman.com
If you want to receive notification of updates on any portion of this site, simply enter your email address here and click/select the button to enter. You will be required to sign up for a free Yahoo! account to complete registration. Please note that Yahoo!'s privacy policy and other management are outside of kimberlychapman.com's responsibility. Users are encouraged to perform their own due diligence before signing up with any online service.
To find out more about the list or read messages without signing up, please visit the Yahoo! page for the kimberlychapman updates mailing list.
For more information on what these tags mean, please see About KimberlyChapman.com.