


All beading graphics on this page were created by Kimberly Chapman, and are my exclusive property. Feel free to link to this page, but please do not steal the graphics and pictures. It took hours of work to make them. If I find them elsewhere on the Internet, I will consider pursuing legal charges against the site owner.
If you incorporate twisted wire in your crafts, particularly in beading trees and some types of flowers, here are some tips to help you get nice, uniform twists and wraps instead of gaps and lumps.
|
When twisting two wires together, it is important to do so by gripping the beaded portion and turning that, as opposed to grabbing one wire and wrapping it around the other. If the wires are two inches or shorter, grip the opposite end and hold that as you turn the beaded end. If the wires are longer than two inches, start by pinching the wires about two inches down from the beaded portion you're turning. When the twists reach your fingers, move down another two inches or so, and repeat as far as desired. |
|
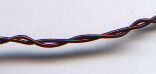
Here's a scan of some well-twisted wire. Notice that the twist is fairly uniform, and each wire is twisted around the other as opposed to one wire wrapped around the other. |
|
Twisting from the top down instead of wrapping will help you get an even twist, whereas wrapping produces a more random, and thus weaker, result. Here are two scans of wires twisted improperly: The first shows the result of twisting by wrapping one wire around the other: one wire remained mostly straight while the wrapped one is bent unevenly around it. The second shows what happens if you don't grip the wires close enough to the point of turning: again, one wire remains straighter than the other, and the result looks more like loose rope than a nice, solid twist. |
|
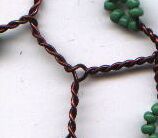
Even if you do nice, even twists, you may find that you have gaps appear where two twisted portions meet, as shown in this scan. This is easy to fix: just give one of the portions another twist or two to close the gap. If that doesn't do it quite right, try giving an additional twist to another portion. Depending on the hardness of your wire, you may need to use some pliers near the gap to twist for you, but be sure to use a bit of cloth or other protection so you don't scuff the wire. |
Be sure not to over-twist any wire, as it will break. It can be very frustrating to have a petal or branch snap off because of overly tight twisting!

For most wire-wrapping projects, I highly recommend not cutting the wire off of the spool until the wrap is complete. Keep the spool beside you and just allow the wire to roll off as you pull on it during the wrapping.
|
When you are wrapping wire around a structure, such as in the making of beaded tree trunks, start by holding a small tail against the structure tightly. Then wrap the wire around that starter tail tightly to hold it in place. |
|
As you proceed wrapping the wire, go slowly and surely, making sure each wrap fits snugly against the one before. When going around bends and curves, you may have to overlap inner curved in order to provide sufficient coverage on the outside of curves. Going slowly will help you do this evenly without unsightly bunch-ups. The angle of the wrap will depend on what you're wrapping and the overall design you're going for. When wrapping a beaded tree, I find that I end up wrapping at around 45 degrees because I've started with branches on one side and then worked my way down. The angle is less important than ensuring the wraps fit against each other without overlapping. Avoid going back and forth over areas, as this will result in missed spots in some areas and pile-ups elsewhere. This not only doesn't look as nice, but it sucks up more wire as you constantly try to go back and fill in those gaps. |
Use this link to view this page with my preferred colour and font settings.
Page last updated December 4, 2003.
Email me at crafts@kimberlychapman.com
If you want to receive notification of updates on any portion of this site, simply enter your email address here and click/select the button to enter. You will be required to sign up for a free Yahoo! account to complete registration. Please note that Yahoo!'s privacy policy and other management are outside of kimberlychapman.com's responsibility. Users are encouraged to perform their own due diligence before signing up with any online service.
To find out more about the list or read messages without signing up, please visit the Yahoo! page for the kimberlychapman updates mailing list.
For more information on what these tags mean, please see About KimberlyChapman.com.
![[Graphic: Proper Grip and Motion to Twist Wire]](bfgoodgrip.gif)
![[Graphic: Improper Grip and Motion to Twist Wire]](bfbadtwist.gif)


![[Graphic: Starting a wire wrap]](bfstartwrap.gif)
![[Graphic: Proper Wire Wrapping Diagram]](bfgoodwrap.gif)
![[Graphic: Improper Wire Wrapping Diagram]](bfbadwrap.gif)