


All beading graphics on this page were created by Kimberly Chapman, and are my exclusive property. Feel free to link to this page, but please do not steal the graphics and pictures. It took hours of work to make them. If I find them elsewhere on the Internet, I will consider pursuing legal charges against the site owner.
This lesson will assume you are comfortable with the brick stitch. As with the pictures for the brick stitch, I don't usually use black thread; that's just for contrast. I've drawn blue arrows to indicate the direction of the thread and/or needle, and sometimes the thread loops offscreen, so just imagine it via these arrows.
Tubular patterns look diagonal because the piece works that way, as you'll see when you do it. This example is not from a pattern, but rather just yellow and green beads to illustrate.
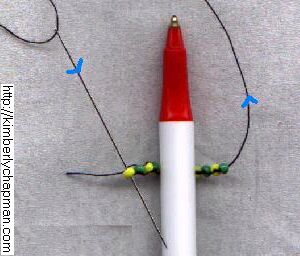
You'll need something to do the tube beading around, even if the support is something you plan to remove later. This is too difficult and fiddly to do without a support. The support can be your finger if that's the right size, but be prepared to stick/scrape yourself with the needle fairly often. You'll also need to start with a ladder long enough to wrap around wherever you're starting on the support. This may take some adjusting to pick the width of beads to get the best fit, if you plan to leave the beads around the support, such as an ornament. It's better to have small gaps between beads than to have them bunched up, so don't make your ladder too long.
For this example, I'm using a pen as the support, but you can wrap beads around glass, boxes, and many other things.
This is the page with reversed pictures for left-handed people. I am right handed, so I did the best I could in reversing everything to make it easier to follow. If you are right handed, you'll probably want to use the original instructions.
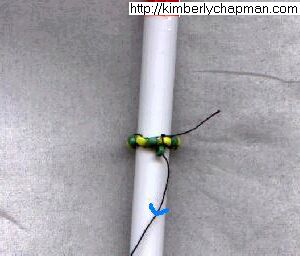
Put the ladder around the support. Be sure to arrange it so it is not twisted at any point; this will be very difficult for long strings, and you may wish to temporarily tape or pin it to the support. Depending on whether you have an even or odd number of beads in your ladder, the thread will be pointing up or down when you wrap it around the support. It doesn't matter which way it is pointing except to ensure that when you connect the ends of the ladder that you're forming an untwisted loop. So if the thread is going up as in the picture, you want to thread down through the FIRST bead of the ladder. If the thread is going down, go up through the first bead. |
|
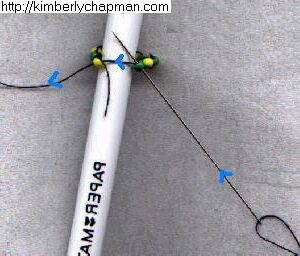
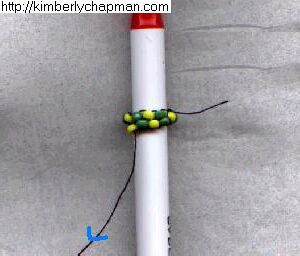
Now close the loop between the ends of the ladder by going back through the LAST bead in the opposite direction. In the picture, since I went down through the yellow bead, I'm going up through the end green bead. |
|
You're going to need that thread to go down so you can start the next row, plus it would help to toughen up this loop that holds the ends of the ladder together. So continue the loop around back through the first bead in the same direction as before. In the picture, I'm going back down through the yellow bead. I've left it loose as a visual aid, but as you do this loop, pull the whole thing snug. If there is too large a gap, pull the thread out of this loop and put on another bead. If the row won't sit flush to the support because there are too many beads, go back and remove one. |
|
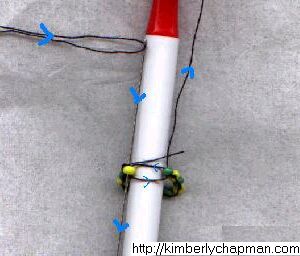
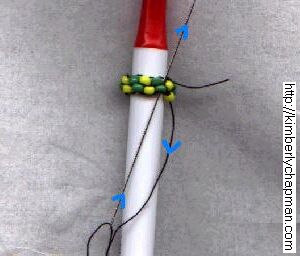
Once you've got that loop snug, thread another bead. You're now going to stitch beads on just as you would a regular brick stitch, going through the thread loop between the beads above. I've found that because I hold the tubular stuff upside down relative to how I hold flat brick stuff, it's easier to put the needle down through the loop instead of up through it. It really doesn't matter which way you go through, as long as you're making a new loop to interlock with the loop from the previous row. As you add these first few beads on the second row, take care to keep the first row snug. The act of stitching will likely pull that first row loose, so you may have some fiddly thread work to do to keep it all nice and neat. |
|
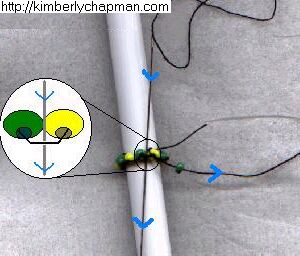
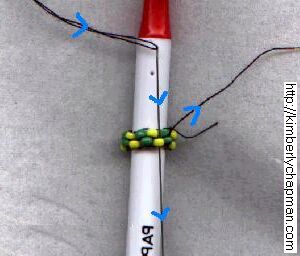
Go back down through the bead you just added, just like the regular brick stitch. |
|
Continue to add beads along, just like with regular brick stitch. If your support changes shape, such as a curved ornament, you may need to increase or decrease the number of beads in the row. Unless following a pattern, I just do this by eye; if the support is getting wider, as the beads on the new row start to get further from the loop they're supposed to be attached to, I just add another bead by going through one loop twice. If the support is getting smaller, I will skip a loop where the beads are passing them. Depending on how gradual the size change is, I will add/skip several times per row, trying to spread out the additions/skips. There is a picture example of adding a bead during the lesson on circular brick stitch. |
|
When you get to the end of a row, push the needle up through the first bead of the row to close the loop. |
|
Then go back down the second bead of that row to bring the thread into the ready position for the next row. This is why tubular patterns are diagonal; at each row, you're shifting to the side by a bead. Continue this stitch as needed for the entire project, and finish as usual. |
Page last updated December 4, 2003.
Use this link to view this page with my preferred colour and font settings.
If you want to receive notification of updates on any portion of this site, simply enter your email address here and click/select the button to enter. You will be required to sign up for a free Yahoo! account to complete registration. Please note that Yahoo!'s privacy policy and other management are outside of kimberlychapman.com's responsibility. Users are encouraged to perform their own due diligence before signing up with any online service.
To find out more about the list or read messages without signing up, please visit the Yahoo! page for the kimberlychapman updates mailing list.
For more information on what these tags mean, please see About KimberlyChapman.com.